Follow Me On Social Media!
No Bake Cheesecake Jars
Introduction
Did you know that desserts served in individual portions are 73% more likely to be shared on social media than their full-sized counterparts? This fascinating trend has made No Bake Cheesecake Jars one of the most sought-after desserts for both home cooks and professional caterers. These delightful, creamy treats combine the rich indulgence of traditional cheesecake with the convenience of no-bake preparation and the charm of personal-sized servings.
Whether you're hosting a dinner party, planning a romantic date night, or simply craving something sweet without the hassle of turning on your oven, No Bake Cheesecake Jars offer the perfect solution. They're Instagram-worthy, make-ahead friendly, and surprisingly simple to create. Plus, with endless flavor variations and topping possibilities, you can customize these mini desserts to suit any taste preference or dietary requirement.
Ingredients List
Creating the perfect No Bake Cheesecake Jars requires just a handful of quality ingredients that work together to create layers of flavor and texture:
For the Graham Cracker Crust:
- 1½ cups graham cracker crumbs (about 12 crackers, finely crushed) – substitute with digestive biscuits or vanilla wafers
- ⅓ cup melted unsalted butter – use coconut oil for dairy-free option
- 2 tablespoons granulated sugar
- Pinch of salt to enhance sweetness
For the Creamy Cheesecake Filling:
- 16 oz cream cheese, softened to room temperature – the star ingredient that creates that signature tangy richness
- 1 cup powdered sugar, sifted – creates silky smooth texture
- 1 teaspoon pure vanilla extract – adds aromatic depth
- 1 cup heavy whipping cream, cold – substitute with coconut cream for dairy-free version
- 2 tablespoons fresh lemon juice – brightens the overall flavor profile
For the Berry Topping:
- 1 cup fresh mixed berries (strawberries, blueberries, raspberries)
- 2 tablespoons berry jam or preserves – intensifies the fruit flavor
- Fresh mint leaves for garnish
Timing
Preparation Time: 20 minutes
Chilling Time: 4 hours (minimum) to overnight
Total Time: 4 hours 20 minutes
Compared to traditional baked cheesecake that requires 1-2 hours of baking plus cooling time, these no-bake versions save you significant time while delivering equally impressive results. The beauty lies in the hands-off chilling process that does all the work for you.
Step-by-Step Instructions
Step 1: Prepare Your Jars and Workspace
Start by gathering 6-8 mason jars or clear glass containers (4-6 oz capacity works perfectly). Wash and dry them thoroughly. Set up your workspace with all ingredients at room temperature, except for the heavy cream which should remain cold. This temperature contrast is crucial for achieving the perfect texture in your cheesecake filling.
Step 2: Create the Graham Cracker Base
In a medium bowl, combine graham cracker crumbs, melted butter, sugar, and salt. Mix until the mixture resembles wet sand and holds together when pressed. The key here is achieving the right moisture level – too dry and it won't bind, too wet and it becomes soggy. Divide this mixture evenly among your jars, pressing down firmly with the back of a spoon to create a compact base layer.
Step 3: Whip the Heavy Cream
Using a stand mixer or hand mixer, whip the cold heavy cream to stiff peaks. This typically takes 2-3 minutes on high speed. Watch carefully to avoid over-whipping, which can lead to a grainy texture. The cream should hold its shape when the beaters are lifted.
Step 4: Prepare the Cheesecake Filling
In a separate large bowl, beat the softened cream cheese until completely smooth and free of lumps – this is non-negotiable for silky cheesecake jars. Gradually add powdered sugar, vanilla extract, and lemon juice, beating until well combined. Gently fold in one-third of the whipped cream to lighten the mixture, then carefully fold in the remaining cream in two additions.
Step 5: Assemble Your No Bake Cheesecake Jars
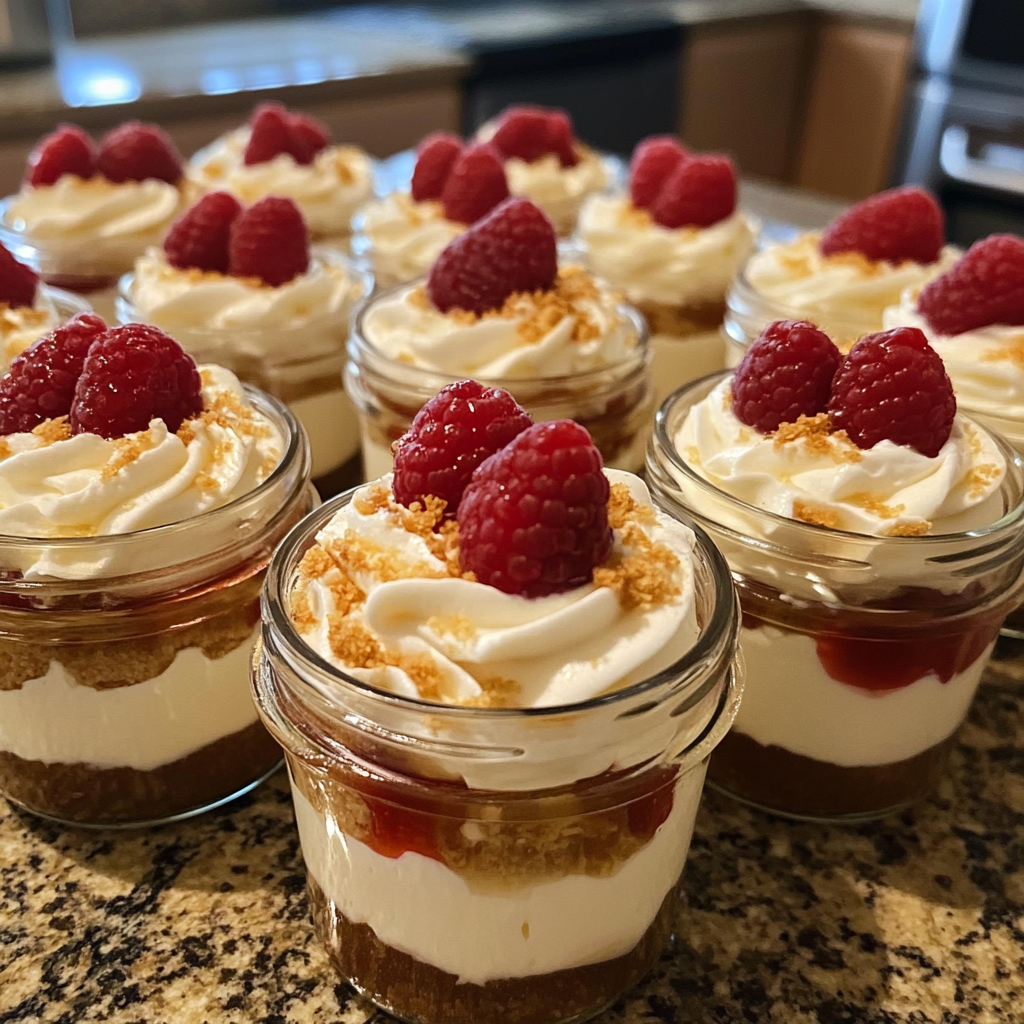
Using a piping bag or large spoon, layer the cheesecake filling over the graham cracker base in each jar. Fill to about ¾ full, leaving room for toppings. Tap jars gently on the counter to eliminate air bubbles and create smooth, even layers.
Step 6: Add the Finishing Touches
Top each jar with fresh berries and a small dollop of berry jam. For an extra elegant presentation, arrange the berries in a decorative pattern and add a sprig of fresh mint.
Nutritional Information
Per serving (based on 8 servings):
- Calories: 385
- Protein: 6g
- Carbohydrates: 28g
- Fat: 28g
- Fiber: 1g
- Sugar: 24g
These individual cheesecake portions provide a good source of calcium from the cream cheese, supporting bone health. The berries contribute antioxidants and vitamin C, making these treats slightly more nutritious than traditional heavy desserts.
Healthier Alternatives for the Recipe
Transform your No Bake Cheesecake Jars into guilt-free indulgences with these smart substitutions:
Low-Carb Version: Replace graham crackers with crushed nuts (almonds or pecans) mixed with a sugar substitute like erythritol. Use sugar-free cream cheese and replace powdered sugar with powdered monk fruit sweetener.
Vegan Option: Substitute cream cheese with cashew cream cheese, use coconut cream instead of heavy cream, and replace graham crackers with vegan-friendly cookies. Coconut oil works perfectly in place of butter.
Lighter Version: Use light cream cheese, Greek yogurt (½ cup replacing some cream cheese), and reduced-fat whipped topping. This cuts calories by approximately 30% while maintaining creamy texture.
Protein-Packed Alternative: Add 2 tablespoons of vanilla protein powder to boost protein content to 12g per serving, perfect for fitness enthusiasts.
Serving Suggestions
Elevate your No Bake Cheesecake Jars with these complementary pairings:
Beverage Pairings: Serve alongside freshly brewed coffee, Earl Grey tea, or a glass of dessert wine like Moscato. For special occasions, pair with champagne or prosecco.
Seasonal Variations: In fall, top with cinnamon-spiced apple compote and crushed gingersnaps. Winter calls for chocolate shavings and peppermint. Spring brings fresh strawberry coulis, while summer is perfect with tropical fruits like mango and passion fruit.
Elegant Presentation: Serve on small dessert plates with decorative spoons, add edible flowers for special occasions, or create a dessert board with assorted nuts and chocolates.
Common Mistakes to Avoid
Avoid these pitfalls to ensure perfect cheesecake jars every time:
Over-mixing the Filling: This incorporates too much air and can cause the mixture to deflate during chilling. Fold ingredients gently to maintain that creamy, dense texture characteristic of quality cheesecake.
Using Cold Cream Cheese: Cold cream cheese creates lumps that are nearly impossible to eliminate. Always bring to room temperature for smooth blending.
Insufficient Chilling Time: Rushing the setting process results in loose, pudding-like consistency instead of firm cheesecake texture. Plan for at least 4 hours, preferably overnight.
Wet Graham Cracker Base: Adding too much butter creates a soggy bottom layer that lacks structural integrity.
Storing Tips
Refrigeration: Store covered No Bake Cheesecake Jars in the refrigerator for up to 5 days. Cover tightly with plastic wrap or jar lids to prevent absorption of other flavors.
Freezing: These freeze beautifully for up to 3 months. Wrap individual jars in plastic wrap before freezing. Thaw in refrigerator for 4-6 hours before serving.
Make-Ahead Strategy: Prepare the cheesecake layer up to 2 days in advance, but add fresh fruit toppings just before serving to maintain optimal texture and appearance.
Transportation: The jar format makes these perfect for picnics or potlucks – just secure the lids and transport in a cooler with ice packs.
Conclusion
No Bake Cheesecake Jars represent the perfect intersection of convenience, elegance, and indulgence. They deliver all the creamy satisfaction of traditional cheesecake while offering the flexibility of individual portions and make-ahead convenience. Whether you're a beginner baker or an experienced dessert enthusiast, this recipe guarantees impressive results with minimal effort.
The beauty of these portable desserts lies in their versatility – customize flavors, adjust sweetness levels, and experiment with seasonal toppings to create your signature version. Ready to impress your family and friends? Gather your ingredients and start creating these delightful treats today. Don't forget to share your beautiful creations on social media and tag us – we love seeing your culinary masterpieces!
FAQs
Q: Can I make No Bake Cheesecake Jars without heavy cream?
A: Yes! You can substitute with whipped coconut cream, Greek yogurt mixed with a little milk, or store-bought whipped topping. Each alternative will slightly change the texture but still produce delicious results.
Q: How long do these cheesecake jars need to set?
A: Minimum 4 hours for a soft-set consistency, but overnight (8-12 hours) produces the best firm, sliceable texture that's characteristic of proper cheesecake.
Q: What's the best way to crush graham crackers for the crust?
A: Place crackers in a sealed plastic bag and crush with a rolling pin, or use a food processor for more uniform crumbs. Aim for fine crumbs with some small pieces for texture.
Q: Can I use frozen berries for the topping?
A: Fresh berries work best for optimal texture and appearance. If using frozen, thaw completely and drain excess liquid first, though they may be softer and release more juice than fresh berries.


