Follow Me On Social Media!
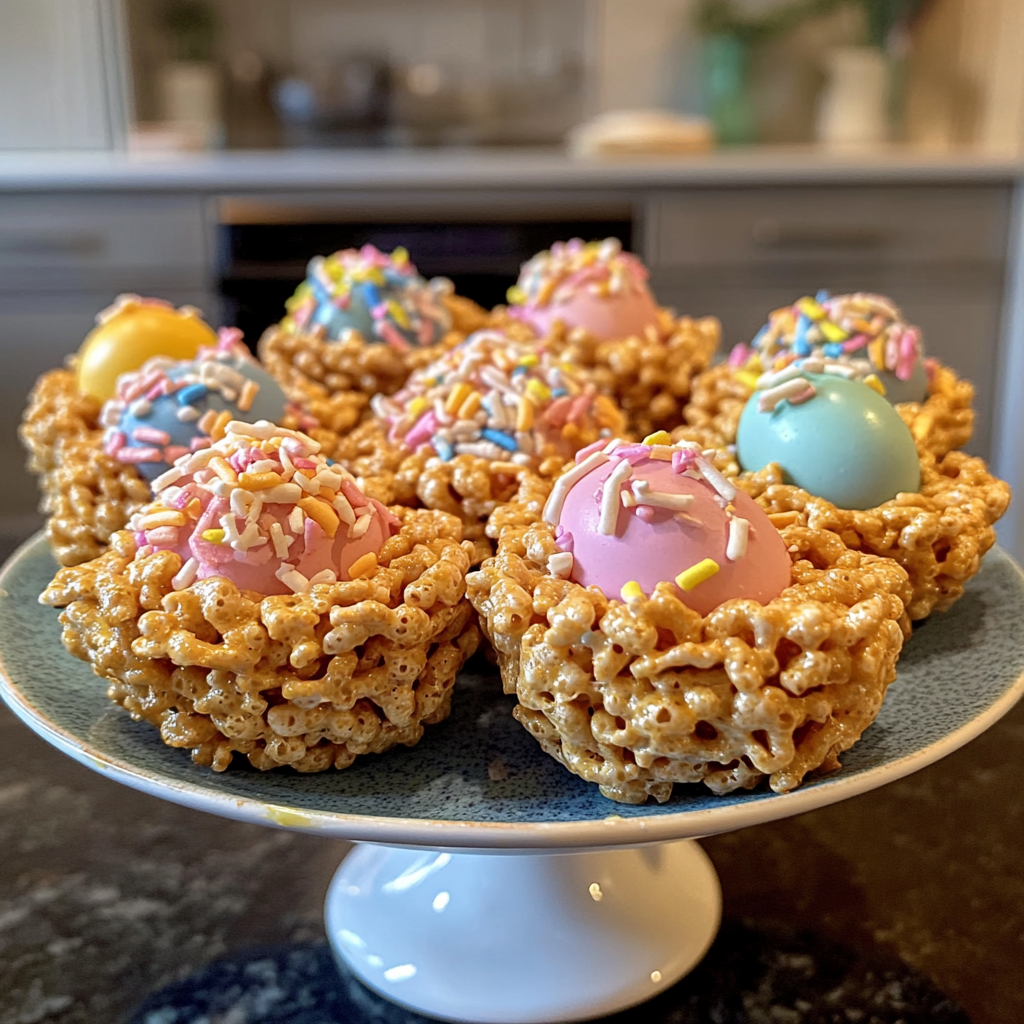
Krispies Easter Egg Nests
Introduction: The Sweet Secret Behind Perfect Easter Treats
Did you know that the average American consumes over 16 pounds of chocolate annually, with a significant spike during Easter season? While store-bought Easter treats dominate supermarket shelves, there's something magical about creating homemade Krispies Easter Egg Nests that brings families together during this special holiday. These delightful, crunchy treats combine the nostalgic charm of Rice Krispies cereal with the festive spirit of Easter, creating edible nests that are almost too cute to eat.
What makes Krispies Easter Egg Nests truly special isn't just their adorable appearance – it's the perfect balance of textures and flavors that create an unforgettable Easter experience. The crispy cereal provides a satisfying crunch, while melted chocolate or marshmallows bind everything together into charming nest-shaped treats. Whether you're planning an Easter brunch, looking for a fun activity with kids, or simply want to add homemade touches to your holiday celebration, these Easter egg nests deliver both visual appeal and delicious taste that will have everyone asking for the recipe.

Ingredients List: Everything You Need for Perfect Easter Nests
Creating these delightful Krispies Easter Egg Nests requires just a handful of simple ingredients that you likely already have in your pantry. The beauty of this recipe lies in its simplicity and the endless possibilities for customization.
Essential Ingredients:
- 3 cups Rice Krispies cereal (or any crispy rice cereal for budget-friendly option)
- 12 oz milk chocolate chips (substitute with dark chocolate for richer flavor or white chocolate for sweeter taste)
- 2 tablespoons coconut oil or butter (helps create smooth, glossy chocolate)
- 24-30 small chocolate Easter eggs or jelly beans
- 1/4 teaspoon vanilla extract (optional, but adds depth of flavor)
Optional Flavor Enhancers:
- 1 tablespoon honey (for natural sweetness and binding)
- Pinch of sea salt (enhances chocolate flavor)
- Food coloring (to tint white chocolate nests in pastel shades)
Substitution Options:
Replace Rice Krispies with crushed cornflakes for extra crunch, or use gluten-free cereal for dietary restrictions. Vegan chocolate chips work perfectly for plant-based versions, while sugar-free chocolate accommodates diabetic-friendly needs.
Timing: Quick and Easy Easter Magic
The beauty of Krispies Easter Egg Nests lies in their incredibly quick preparation time, making them perfect for last-minute Easter preparations or when you need treats in a hurry.
Preparation Time: 15 minutes
Chilling Time: 30 minutes
Total Time: 45 minutes
Yield: 12 individual nests
Compared to traditional Easter cookies that can take 2-3 hours from start to finish, these nests are remarkably efficient. The actual hands-on time is minimal, with most of the total time spent allowing the chocolate to set properly in the refrigerator.
Step-by-Step Instructions: Crafting Your Easter Masterpieces
Step 1: Prepare Your Workspace
Clear a large workspace and line a baking sheet with parchment paper. This prevents sticking and makes cleanup effortless. Have your Easter eggs ready nearby, as you'll need to work quickly once the chocolate mixture is prepared.
Step 2: Melt the Chocolate Perfectly
Using a double boiler or microwave-safe bowl, melt chocolate chips with coconut oil. If using microwave, heat in 30-second intervals, stirring between each interval to prevent burning. The mixture should be smooth and glossy – this is crucial for Krispies Easter Egg Nests that hold their shape beautifully.
Step 3: Combine Cereal and Chocolate
Remove melted chocolate from heat and immediately add vanilla extract if using. Quickly fold in Rice Krispies cereal, ensuring every piece is evenly coated. Work efficiently as chocolate begins setting as it cools.
Step 4: Shape Your Nests
Using a large spoon or ice cream scoop, portion mixture onto prepared parchment paper. While chocolate is still warm and pliable, use the back of a smaller spoon to create a depression in the center of each mound, forming the characteristic nest shape.
Step 5: Add Easter Eggs
Gently press 2-3 Easter eggs into each nest's center while chocolate is still slightly soft. This ensures eggs stay securely in place once chocolate sets completely.
Step 6: Set and Serve
Refrigerate Krispies Easter Egg Nests for at least 30 minutes until chocolate is completely firm. Remove from refrigerator 5 minutes before serving for optimal texture.
Nutritional Information: Sweet Treats with Surprising Benefits
Each Krispies Easter Egg Nest contains approximately:
- Calories: 185
- Protein: 3g
- Carbohydrates: 28g
- Fat: 8g
- Fiber: 1g
- Sugar: 22g
While these treats are undeniably indulgent, Rice Krispies cereal provides iron and B vitamins, supporting energy metabolism. Dark chocolate varieties offer antioxidants that may support heart health, making these Easter treats a slightly more nutritious option compared to purely sugar-based candies.
Healthier Alternatives for the Recipe
Transform your Krispies Easter Egg Nests into more nutritious treats without sacrificing taste or visual appeal.
Lower Sugar Version: Replace half the chocolate chips with unsweetened cocoa powder mixed with a natural sweetener like stevia or monk fruit. This reduces sugar content by approximately 40% while maintaining rich chocolate flavor.
Vegan-Friendly Nests: Use vegan chocolate chips and replace butter with coconut oil. Many popular Easter candy brands now offer vegan alternatives that work perfectly as nest decorations.
Gluten-Free Option: Substitute regular Rice Krispies with certified gluten-free crispy rice cereal. Always verify that your Easter eggs are also gluten-free if celiac disease is a concern.
Protein-Packed Version: Add 2 tablespoons of vanilla protein powder to the melted chocolate mixture, increasing protein content and creating a more satisfying treat that helps stabilize blood sugar levels.
Serving Suggestions: Elevating Your Easter Presentation
Krispies Easter Egg Nests shine brightest when presented thoughtfully as part of your Easter celebration spread.
Easter Brunch Display: Arrange nests on a tiered serving stand alongside fresh berries, mini muffins, and pastel-colored macarons. The varying heights create visual interest while the color coordination enhances the festive atmosphere.
Children's Party Centerpiece: Create an edible Easter garden by placing nests on green coconut "grass" (coconut flakes tinted with green food coloring) and surrounding them with chocolate rabbits and marshmallow chicks.
Elegant Adult Gathering: Serve nests on individual dessert plates with a small scoop of vanilla bean ice cream and a drizzle of caramel sauce, transforming simple treats into sophisticated desserts.
Gift Presentation: Package individual nests in clear cellophane bags tied with pastel ribbons, creating perfect take-home favors or hostess gifts.
Common Mistakes to Avoid: Ensuring Perfect Results
Overheating Chocolate: The most frequent error when making Krispies Easter Egg Nests is overheating chocolate, which causes it to seize and become grainy. Always use low heat and stir frequently.
Working Too Slowly: Once chocolate and cereal are combined, work quickly to shape nests. Hesitation leads to chocolate hardening before proper shaping, resulting in irregular, less attractive nests.
Insufficient Chilling: Rushing the setting process creates nests that fall apart when handled. Ensure full 30-minute refrigeration time for structural integrity.
Overcrowding Easter Eggs: While it's tempting to load nests with decorations, too many eggs create unstable structures that topple easily. Stick to 2-3 eggs per nest for best results.
Inconsistent Sizing: Varying nest sizes look unprofessional and cook unevenly. Use an ice cream scoop or measuring cup for uniform portions.
Storing Tips: Maintaining Freshness and Appeal
Proper storage ensures your Krispies Easter Egg Nests maintain their delightful crunch and visual appeal for maximum enjoyment.
Short-Term Storage: Store completed nests in an airtight container at room temperature for up to 5 days. Layer between parchment paper sheets to prevent sticking and maintain shape integrity.
Refrigeration Guidelines: In warmer climates or during hot weather, refrigerate nests to prevent chocolate melting. Allow them to come to room temperature for 10 minutes before serving for optimal texture.
Freezing Instructions: Krispies Easter Egg Nests freeze beautifully for up to 3 months. Wrap individually in plastic wrap, then store in freezer-safe containers. Thaw gradually in refrigerator overnight before serving.
Humidity Considerations: Avoid storing in humid environments, as moisture causes cereal to lose crispness and chocolate to develop white bloom, affecting both texture and appearance.
Conclusion: Creating Memorable Easter Moments
Krispies Easter Egg Nests represent more than just a simple treat – they're an opportunity to create lasting memories with loved ones while celebrating the joy and renewal that Easter represents. These charming confections combine nostalgic flavors with festive presentation, delivering smiles to faces both young and old. The simplicity of the recipe means that even novice bakers can achieve professional-looking results, while the quick preparation time accommodates busy holiday schedules.
Whether you're continuing a family tradition or starting a new one, these delightful nests offer the perfect balance of simplicity and satisfaction. The combination of crispy textures, rich chocolate, and colorful decorations creates treats that are as pleasing to the eye as they are to the palate.
Ready to bring some homemade magic to your Easter celebration? Gather your ingredients, invite the family to help, and start creating these adorable Krispies Easter Egg Nests today. Don't forget to share photos of your creations and let us know how your Easter guests react to these irresistible treats!
FAQs: Your Questions Answered
Q: Can I make Krispies Easter Egg Nests ahead of time for a large Easter gathering?
A: Absolutely! These nests actually improve with time as flavors meld together. Make them up to one week in advance and store in airtight containers. They're perfect for meal prep and reducing last-minute holiday stress.
Q: What's the best way to fix nests that fall apart after setting?
A: If your nests crumble, gently remelt the mixture with an additional tablespoon of coconut oil or butter. The extra fat helps bind ingredients more effectively. Reshape and chill again for firmer results.
Q: Are there nut-free alternatives for households with allergies?
A: Yes! This basic Krispies Easter Egg Nests recipe is naturally nut-free when using standard Rice Krispies and milk chocolate. Always verify that your chosen Easter egg candies are also produced in nut-free facilities if severe allergies are a concern.
Q: Can I use different cereals besides Rice Krispies for variety?
A: Certainly! Experiment with Corn Flakes for extra crunch, Cheerios for a different shape, or even crushed graham crackers for a s'mores-inspired variation. Each cereal creates unique textures while maintaining the basic nest structure.


