Follow Me On Social Media!
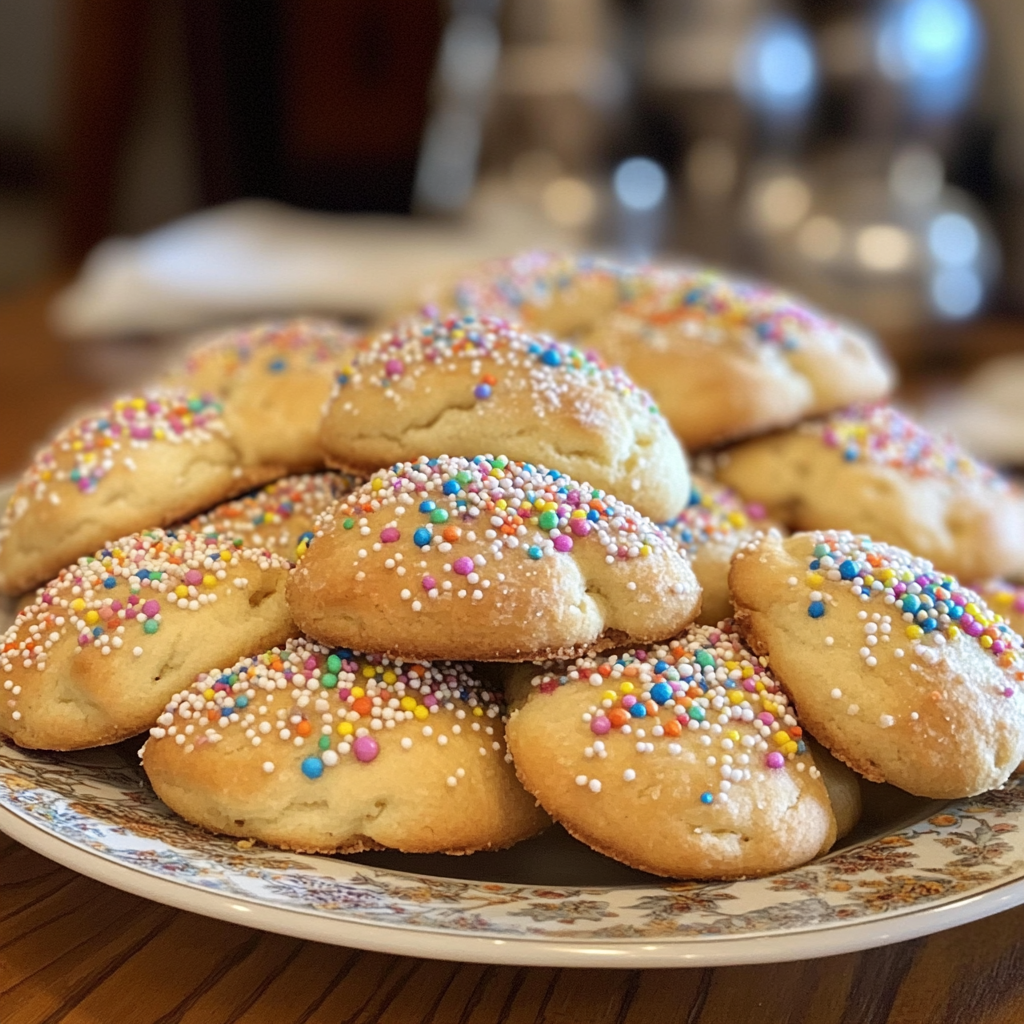
Italian Easter Cookies
Introduction
Did you know that Italian households consume over 2.3 million pounds of Italian Easter cookies annually during the Easter season? This staggering statistic might surprise you, especially considering that many people believe these traditional treats are only enjoyed by Italian families. The truth is, these delightful cookies have captured hearts worldwide with their unique flavors, beautiful decorations, and rich cultural significance. Italian Easter cookies, known as "biscotti di Pasqua" in Italy, represent centuries of baking tradition that combines simple ingredients with extraordinary taste. Whether you're looking to honor your Italian heritage, create new family traditions, or simply indulge in some of the world's most delicious cookies, this comprehensive guide will walk you through everything you need to know about making authentic Italian Easter cookies at home.

Ingredients List
Creating the perfect batch of traditional Italian Easter cookies requires quality ingredients that work harmoniously together. Here's what you'll need for approximately 36 cookies:
For the Cookie Dough:
- 3 cups all-purpose flour (can substitute with 00 flour for more authentic texture)
- 1 cup granulated sugar (superfine sugar creates smoother dough)
- ½ cup unsalted butter, softened (European-style butter adds richness)
- 3 large eggs, room temperature (free-range eggs provide better flavor)
- 2 teaspoons vanilla extract (pure vanilla, not imitation)
- 1 teaspoon almond extract (adds traditional Italian flavor)
- 2 teaspoons baking powder (ensure it's fresh for proper rise)
- ½ teaspoon salt (sea salt preferred)
- 2 tablespoons whole milk (can substitute with heavy cream)
For the Glaze:
- 2 cups powdered sugar, sifted (removes lumps for smooth glaze)
- 3-4 tablespoons milk (adjust for desired consistency)
- 1 teaspoon vanilla extract
- Food coloring (traditional pastel colors: pink, yellow, green, blue)
For Decoration:
- Colorful sprinkles (nonpareils work best)
- Mini chocolate chips (optional)
- Candied fruits (traditional Italian touch)
Substitution Options:
- Gluten-free flour blend can replace all-purpose flour
- Vegan butter substitute works for dairy-free versions
- Egg replacer can substitute real eggs for vegan cookies
Timing
Understanding the time commitment for Italian Easter cookies helps you plan your baking session effectively:
Preparation Time: 25 minutes
Chilling Time: 1 hour (essential for workable dough)
Baking Time: 12-15 minutes per batch
Cooling Time: 30 minutes
Decorating Time: 45 minutes
Total Time: Approximately 3 hours
This timing is slightly longer than average sugar cookies (which typically take 2 hours total) due to the traditional techniques and decorating process that make Italian Easter cookies special. The extra time investment pays off with superior flavor and authentic texture.
Step-by-Step Instructions
Step 1: Prepare Your Workspace
Clear a large, clean surface for rolling dough and set up your mixing station. Preheat your oven to 350°F (175°C) and line baking sheets with parchment paper. Having everything organized before starting ensures smooth preparation of your Italian Easter cookies.
Step 2: Create the Cookie Dough Base
In a large mixing bowl, cream together the softened butter and granulated sugar until light and fluffy (approximately 3-4 minutes with an electric mixer). This step is crucial for achieving the tender texture that distinguishes authentic Italian Easter cookies from ordinary sugar cookies.
Step 3: Incorporate Wet Ingredients
Add eggs one at a time, beating well after each addition. Mix in vanilla extract, almond extract, and milk until fully combined. The almond extract provides the distinctive flavor that makes these cookies unmistakably Italian.
Step 4: Combine Dry Ingredients
In a separate bowl, whisk together flour, baking powder, and salt. Gradually add this mixture to the wet ingredients, mixing on low speed until just combined. Overmixing can result in tough cookies, so stop as soon as the dough comes together.
Step 5: Chill the Dough
Wrap the dough in plastic wrap and refrigerate for at least 1 hour. This chilling period makes the dough easier to handle and prevents excessive spreading during baking, ensuring your Italian Easter cookies maintain their shape.
Step 6: Shape Your Cookies
On a lightly floured surface, roll the dough to ¼-inch thickness. Use Easter-themed cookie cutters or traditional round cutters to create your desired shapes. Re-roll scraps only once to maintain tender texture.
Step 7: Bake to Perfection
Place cookies 2 inches apart on prepared baking sheets. Bake for 12-15 minutes, or until edges are lightly golden. The centers should still look slightly soft when you remove them from the oven.
Step 8: Cool Completely
Allow cookies to cool on baking sheets for 5 minutes before transferring to wire racks. Complete cooling is essential before decorating, as warm cookies will cause the glaze to melt.
Nutritional Information
Each Italian Easter cookie (based on 36 servings) contains approximately:
- Calories: 145
- Protein: 2.5g
- Carbohydrates: 26g
- Fat: 3.8g
- Fiber: 0.6g
- Sugar: 18g
- Sodium: 95mg
These cookies provide a moderate amount of energy while delivering the satisfaction of a traditional treat. The eggs contribute high-quality protein, while the moderate fat content helps with satiety. Unlike many commercial cookies, homemade Italian Easter cookies contain no artificial preservatives or excessive additives.
Healthier Alternatives for the Recipe
Transform your Italian Easter cookies into healthier treats without sacrificing authentic flavor:
Lower Sugar Version: Replace half the granulated sugar with unsweetened applesauce and reduce powdered sugar in glaze by 25%. This modification cuts approximately 30 calories per cookie.
Whole Grain Option: Substitute half the all-purpose flour with whole wheat pastry flour for added fiber and nutrients while maintaining tender texture.
Reduced Fat Alternative: Use Greek yogurt to replace half the butter, creating lighter cookies with added protein.
Gluten-Free Version: Use a 1:1 gluten-free flour blend specifically designed for baking. Add an extra ¼ teaspoon of xanthan gum if your blend doesn't include it.
Vegan Italian Easter Cookies: Replace eggs with flax eggs (3 tablespoons ground flaxseed mixed with 9 tablespoons water), use plant-based butter, and substitute dairy milk with almond or oat milk.
Serving Suggestions
Italian Easter cookies shine when presented thoughtfully alongside complementary foods and beverages:
Traditional Pairings: Serve with espresso or strong Italian coffee for an authentic experience. The bitter notes of coffee balance the sweet cookies perfectly.
Wine Pairings: Moscato d'Asti or Prosecco complement these cookies beautifully, especially during Easter brunch celebrations.
Dessert Platters: Arrange Italian Easter cookies alongside other traditional Italian sweets like cannoli, sfogliatelle, or panna cotta for an impressive dessert spread.
Gift Presentation: Package decorated cookies in clear cellophane bags tied with pastel ribbons for beautiful Easter gifts that friends and family will treasure.
Brunch Integration: Include these cookies as part of an Easter brunch buffet alongside fresh fruit, yogurt parfaits, and traditional breakfast items.
Common Mistakes to Avoid
Prevent these frequent errors to ensure your Italian Easter cookies turn out perfectly:
Over-mixing the Dough: Excessive mixing develops gluten, resulting in tough cookies. Mix just until ingredients combine for tender results.
Skipping the Chilling Step: Warm dough spreads excessively during baking, creating misshapen cookies. Always chill dough for at least one hour.
Incorrect Oven Temperature: Too high temperatures brown cookies before they cook through, while too low temperatures create dry, overcooked cookies. Use an oven thermometer for accuracy.
Decorating Warm Cookies: Applying glaze to warm cookies causes melting and messy appearances. Ensure complete cooling before decorating.
Uneven Dough Thickness: Inconsistent rolling creates cookies that bake unevenly. Use rolling pin guides or measure with a ruler for uniform ¼-inch thickness.
Storing Tips
Proper storage maintains the quality and freshness of your Italian Easter cookies:
Room Temperature Storage: Store completely cooled, undecorated cookies in airtight containers for up to one week. Layer between parchment paper to prevent sticking.
Decorated Cookie Storage: Once glaze sets completely (4-6 hours), store decorated cookies in single layers in airtight containers for up to 5 days.
Freezer Storage: Undecorated cookies freeze beautifully for up to 3 months. Wrap individually in plastic wrap, then place in freezer bags. Thaw at room temperature before decorating.
Dough Freezing: Prepare dough through step 5, then freeze wrapped dough for up to 2 months. Thaw overnight in refrigerator before rolling and baking.
Maintaining Freshness: Add a slice of bread to storage containers to help maintain cookie softness, replacing the bread slice every few days.
Conclusion
Italian Easter cookies represent more than just a delicious treat—they embody centuries of tradition, family connections, and the joy of sharing homemade goodness with loved ones. This comprehensive recipe guides you through creating authentic cookies that rival those from Italian bakeries, while offering flexibility for dietary preferences and skill levels. The combination of simple ingredients, traditional techniques, and beautiful decorations makes these cookies perfect for Easter celebrations, gift-giving, or simply satisfying your sweet tooth with something truly special. Don't wait for Easter to try this recipe—start planning your baking session today and discover why Italian Easter cookies have remained beloved for generations. Share your beautiful creations on social media and tag your friends who would love to learn this traditional recipe!
FAQs
Q: Can I make Italian Easter cookies ahead of time?
A: Absolutely! You can bake undecorated cookies up to one week in advance and store them in airtight containers. Decorate them 1-2 days before serving for best appearance. The dough can also be prepared and frozen for up to 2 months.
Q: Why did my Italian Easter cookies spread too much during baking?
A: Cookie spreading typically occurs when the dough is too warm or contains too much butter. Always chill your dough for at least one hour, ensure your butter isn't overly soft when mixing, and check that your oven temperature is accurate.
Q: Can I use different extracts in my Italian Easter cookies?
A: Yes! While vanilla and almond are traditional, you can experiment with lemon extract, orange extract, or even rum extract. Use the same quantities as specified in the recipe for best results.
Q: How do I prevent my cookie glaze from being too thick or too thin?
A: Achieve perfect glaze consistency by adding liquid gradually—one tablespoon at a time. The ideal glaze should coat the back of a spoon but still flow smoothly. If too thick, add milk; if too thin, add more powdered sugar.


