Follow Me On Social Media!
Hawaiian Butter Mochi
Introduction
Did you know that traditional Hawaiian Butter Mochi has been enjoyed by island families for over 150 years, yet many mainland Americans have never experienced its unique chewy-creamy texture? This beloved Hawaiian dessert combines the best of both worlds – the satisfying chew of Japanese mochi with the rich, buttery sweetness that makes it irresistibly addictive. Hawaiian Butter Mochi represents more than just a dessert; it's a cultural bridge that showcases Hawaii's diverse culinary heritage, blending Asian influences with local island flavors.
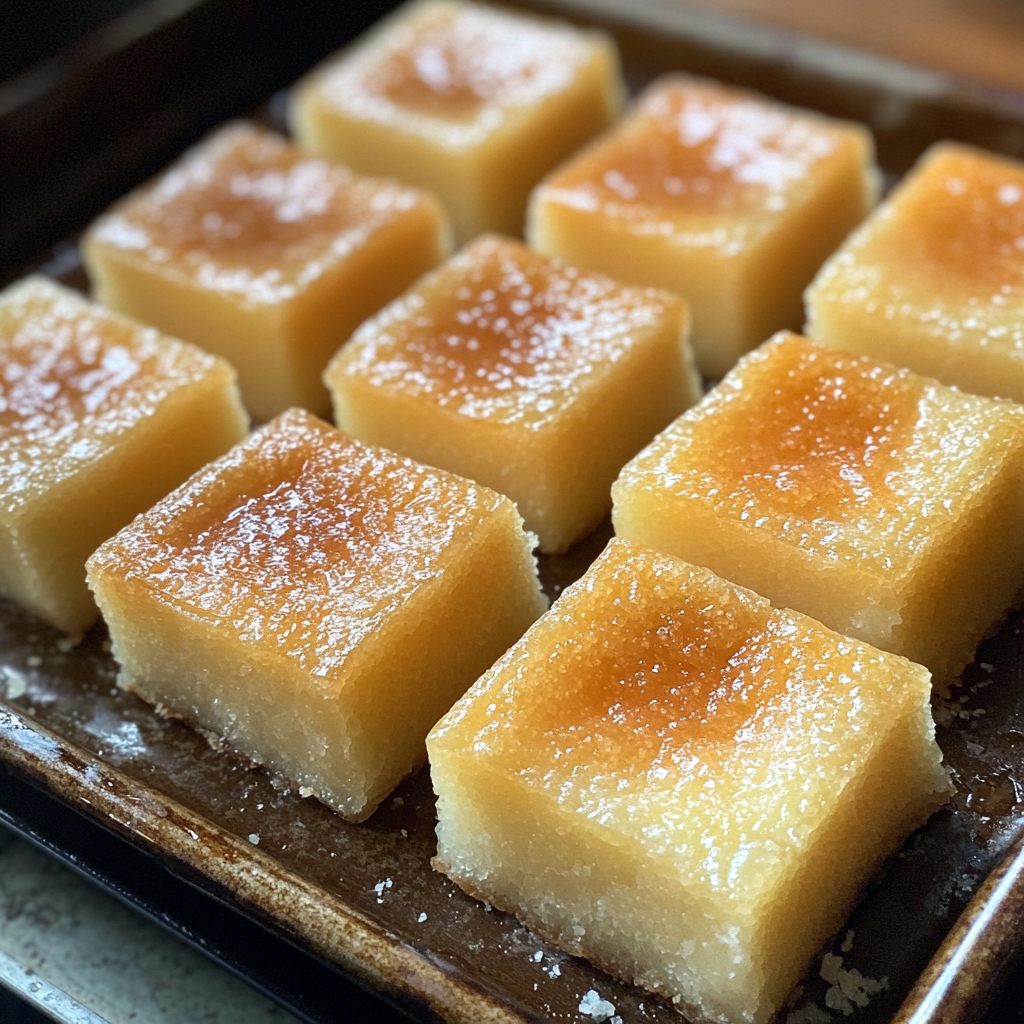
Unlike traditional Japanese mochi that requires specialized equipment and technique, this Hawaiian version uses simple pantry ingredients and can be made in any home kitchen. The result is a golden, slightly crispy exterior that gives way to an incredibly tender, almost custard-like interior that's impossible to resist. Whether you're hosting a luau, looking for a unique potluck contribution, or simply craving something deliciously different, this recipe delivers authentic island flavors that transport you straight to the Hawaiian islands with every bite.

Ingredients List
Creating authentic Hawaiian Butter Mochi requires specific ingredients that work together to achieve that signature texture and flavor. Here's everything you'll need for this tropical treat:
Essential Ingredients:
- 1 pound (16 oz) box mochiko (sweet rice flour) – the foundation that creates the signature chewy texture
- 2½ cups granulated sugar – provides sweetness and helps create the golden crust
- 1 teaspoon baking powder – ensures proper rise and light texture
- ½ teaspoon salt – enhances all flavors and balances sweetness
- 6 large eggs – adds richness and helps bind everything together
- 1 (14 oz) can coconut milk – contributes tropical flavor and moisture
- 1 (12 oz) can evaporated milk – creates creaminess without overwhelming coconut taste
- ½ cup whole milk – adds additional moisture and tenderness
- ½ cup melted butter – provides rich flavor and golden color
- 2 teaspoons vanilla extract – rounds out flavors with warm sweetness
Possible Substitutions:
- Mochiko: Cannot be substituted with regular flour, but glutinous rice flour works identically
- Coconut milk: Light coconut milk reduces calories; full-fat creates richer texture
- Evaporated milk: Heavy cream works but increases richness significantly
- Butter: Coconut oil (melted) for dairy-free version, though flavor changes slightly
- Eggs: No direct substitute exists that maintains proper texture
Timing
Preparation Time: 15 minutes
Baking Time: 60-75 minutes
Cooling Time: 45 minutes minimum
Total Time: 2 hours
This timing is remarkably efficient compared to traditional mochi-making methods, which can take several hours and require specialized equipment. The beauty of Hawaiian butter mochi lies in its simplicity – most of your time is hands-off baking and cooling, making it perfect for busy schedules or when preparing multiple dishes for gatherings.
Step-by-Step Instructions
Step 1: Prepare Your Baking Environment
Preheat your oven to 350°F (175°C) and position the rack in the center. Thoroughly grease a 9×13-inch baking dish with butter, ensuring you coat all corners and sides. This prevents sticking and helps create that coveted golden crust. Line with parchment paper if desired, leaving overhang for easy removal.
Pro Tip: Room temperature ingredients mix more easily and create smoother batter, so remove eggs and milk from refrigerator 30 minutes before starting.
Step 2: Mix Dry Ingredients
In a large mixing bowl, whisk together mochiko, sugar, baking powder, and salt until completely combined. Break up any lumps in the mochiko using the whisk – smooth dry ingredients are crucial for achieving the proper texture without gritty spots.
Chef's Secret: Sifting the mochiko, though not essential, creates an even smoother final product.
Step 3: Combine Wet Ingredients
In a separate bowl, beat eggs thoroughly until light and frothy. Add coconut milk, evaporated milk, whole milk, melted butter, and vanilla extract. Whisk until completely smooth and well-incorporated. The mixture should be creamy and homogeneous.
Important Note: Ensure melted butter isn't too hot, or it will cook the eggs and create lumps.
Step 4: Create the Batter
Pour the wet ingredients into the dry ingredients gradually, whisking constantly to prevent lumps. Continue mixing until the batter is completely smooth and no dry spots remain. The consistency should be similar to thick pancake batter.
Texture Check: The batter should coat a spoon but still pour easily. If too thick, add milk one tablespoon at a time.
Step 5: Bake to Perfection
Pour batter into prepared baking dish, spreading evenly. Bake for 60-75 minutes, until the top is golden brown and a toothpick inserted in center comes out mostly clean with just a few moist crumbs. The surface should be set and slightly springy to touch.
Visual Cues: Look for golden-brown color and edges that pull slightly away from pan sides.
Step 6: Cool and Serve
Allow Hawaiian butter mochi to cool in the pan for at least 45 minutes before cutting. This cooling period lets the texture set properly. Cut into squares using a sharp knife, wiping blade between cuts for clean edges.
Nutritional Information
Per serving (assuming 24 pieces):
- Calories: 185
- Protein: 4g
- Carbohydrates: 32g
- Fat: 5g
- Fiber: 0g
- Sugar: 21g
- Sodium: 95mg
Health Benefits: Sweet rice flour provides easily digestible carbohydrates and is naturally gluten-free, making this dessert suitable for those with gluten sensitivities. Coconut milk contains medium-chain triglycerides (MCTs), which may support metabolism and provide quick energy.
Healthier Alternatives for the Recipe
Lower Calorie Version:
- Replace half the sugar with stevia or monk fruit sweetener
- Use light coconut milk and low-fat evaporated milk
- Substitute half the butter with unsweetened applesauce
Vegan Hawaiian Butter Mochi:
- Replace eggs with flax eggs (6 tablespoons ground flaxseed mixed with 18 tablespoons water)
- Use plant-based butter or coconut oil
- Substitute plant-based milk alternatives
Reduced Sugar Option:
- Cut sugar to 1½ cups and add extra vanilla extract
- Include 1 cup unsweetened shredded coconut for natural sweetness
- Add 2 tablespoons honey or maple syrup for complex sweetness
Serving Suggestions
Hawaiian butter mochi pairs beautifully with tropical flavors and refreshing accompaniments. Serve alongside fresh pineapple slices, mango chunks, or passion fruit coulis for an authentic island experience. A dollop of coconut whipped cream adds luxurious richness, while a light dusting of toasted coconut flakes provides textural contrast.
For beverages, consider serving with Hawaiian coffee, tropical fruit smoothies, or coconut water. The dessert's rich sweetness balances beautifully with slightly bitter or tart accompaniments. During summer gatherings, serve chilled pieces alongside vanilla ice cream for an indulgent treat that captures the essence of Hawaiian hospitality.
Common Mistakes to Avoid
Overmixing the Batter: Unlike traditional cakes, mochi batter benefits from thorough mixing, but avoid aggressive beating once ingredients combine, which can create tough texture.
Incorrect Flour Substitution: Regular flour cannot replace mochiko – the unique properties of sweet rice flour are essential for authentic texture.
Underbaking: The center should be set but still slightly jiggly when done. Underbaked mochi remains gummy and unpleasant.
Cutting Too Soon: Patience during cooling prevents messy, gooey pieces that fall apart.
Wrong Pan Size: Using different pan dimensions affects baking time and texture significantly.
Storing Tips
Refrigeration: Store covered Hawaiian butter mochi in the refrigerator for up to one week. The texture actually improves slightly after the first day as flavors meld together.
Freezing: Wrap individual pieces in plastic wrap and freeze for up to three months. Thaw at room temperature for 30 minutes before serving.
Reheating: Microwave individual pieces for 10-15 seconds to restore soft, warm texture. Avoid overheating, which makes the texture rubbery.
Room Temperature Storage: In humid climates, refrigeration is essential to prevent spoilage, but in dry conditions, covered storage at room temperature works for 2-3 days.
Conclusion
Hawaiian Butter Mochi represents the perfect fusion of cultural influences that makes Hawaiian cuisine so special and beloved worldwide. This recipe delivers authentic island flavors using accessible ingredients and straightforward techniques that guarantee success in any home kitchen. The unique texture – simultaneously chewy and creamy – creates an unforgettable dessert experience that's sure to become a family favorite.
Whether you're exploring Hawaiian cuisine for the first time or seeking to recreate cherished island memories, this butter mochi recipe provides an authentic taste of paradise. Try making this delightful dessert this weekend and share your results with friends and family – we'd love to hear about your Hawaiian butter mochi adventures in the comments below!
FAQs
Q: Can I make Hawaiian Butter Mochi without coconut milk?
A: While coconut milk provides authentic flavor, you can substitute with additional evaporated milk or heavy cream. However, you'll lose some of the tropical taste that makes this dessert distinctly Hawaiian.
Q: Why is my butter mochi too dense or rubbery?
A: This usually results from overbaking or incorrect ingredient measurements. Ensure you're measuring mochiko correctly (it should be spooned and leveled, not packed) and check your oven temperature with a thermometer for accuracy.
Q: How do I know when Hawaiian Butter Mochi is properly baked?
A: The surface should be golden brown and set to touch, with edges slightly pulling away from pan sides. A toothpick should come out with just a few moist crumbs – completely clean means it's overbaked.
Q: Can I add flavoring variations to this recipe?
A: Absolutely! Popular variations include adding 2 tablespoons matcha powder for green tea flavor, 1 cup shredded coconut for extra texture, or 2 tablespoons cocoa powder for chocolate version. Adjust liquid ingredients slightly if adding dry ingredients.


