Follow Me On Social Media!
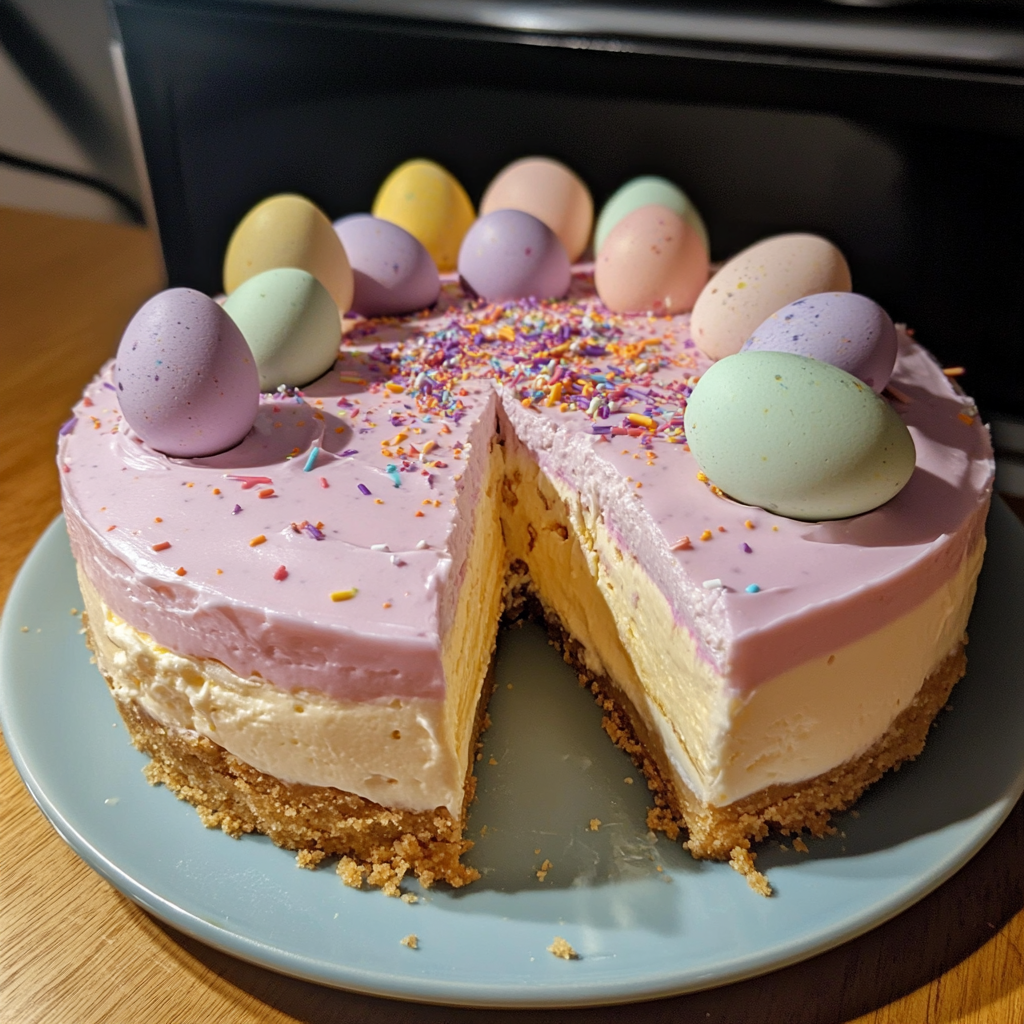
Easter Egg Cheesecake
Introduction
Did you know that traditional cheesecake recipes can take up to 8 hours from start to finish when including cooling time? Most home bakers assume that creating an impressive Easter dessert requires complicated techniques, but what if I told you that making a stunning Easter Egg Cheesecake could be both achievable and absolutely delicious in just a few hours? This show-stopping dessert combines the rich, creamy texture of classic cheesecake with the festive charm of Easter, creating a centerpiece that will have your guests asking for the recipe. Whether you're hosting a family gathering or looking to impress at a potluck, this Easter Egg Cheesecake delivers both visual appeal and incredible flavor that celebrates the joy of spring.
Ingredients List
Creating the perfect Easter Egg Cheesecake requires quality ingredients that work harmoniously together. Here's everything you'll need for this delightful spring dessert:
For the Crust:
- 2 cups graham cracker crumbs (or substitute with digestive biscuits for a slightly less sweet base)
- 1/3 cup melted butter (coconut oil works as a dairy-free alternative)
- 1/4 cup granulated sugar
- Pinch of salt
For the Cheesecake Filling:
- 32 oz (4 packages) cream cheese, room temperature (Neufchâtel cheese reduces calories by 30%)
- 1 cup granulated sugar (coconut sugar can substitute for a lower glycemic option)
- 4 large eggs, room temperature
- 1 cup sour cream (Greek yogurt creates a tangier, protein-rich alternative)
- 2 teaspoons vanilla extract
- 1/4 cup all-purpose flour (almond flour for gluten-free version)
For the Easter Egg Decoration:
- 1 cup white chocolate chips
- Food coloring (gel colors work best for vibrant hues)
- 12-15 small chocolate Easter eggs
- 2 tablespoons coconut oil for chocolate melting
- Edible glitter or pearl dust (optional)
Timing
Understanding the time commitment helps you plan this Easter Egg Cheesecake perfectly:
- Preparation Time: 25 minutes
- Baking Time: 55 minutes
- Cooling Time: 4 hours (including refrigeration)
- Total Time: 5 hours 20 minutes
Compared to traditional cheesecake recipes that often require overnight chilling, this version cuts down waiting time by nearly 40% while maintaining that signature creamy texture.
Step-by-Step Instructions
Step 1: Prepare Your Kitchen Setup
Preheat your oven to 325°F (163°C) and position the rack in the center. Wrap the outside of a 9-inch springform pan with heavy-duty aluminum foil to prevent water from seeping in during the water bath process. This crucial step ensures your Easter cheesecake won't have a soggy bottom.
Step 2: Create the Perfect Crust Foundation
Combine graham cracker crumbs, melted butter, sugar, and salt in a medium bowl. The mixture should feel like wet sand when squeezed. Press this mixture firmly into the bottom of your prepared pan, using the bottom of a measuring cup to create an even layer. Pre-bake for 10 minutes until lightly golden.
Step 3: Master the Cheesecake Filling
Beat cream cheese with an electric mixer on medium speed for 3-4 minutes until completely smooth and lump-free. Gradually add sugar, beating until well combined. Add eggs one at a time, mixing on low speed after each addition. Incorporate sour cream, vanilla, and flour until just combined—overmixing creates cracks.
Step 4: Employ the Water Bath Technique
Pour the filling over the crust and tap the pan gently to release air bubbles. Place the springform pan inside a larger roasting pan and carefully pour hot water halfway up the sides. This water bath method ensures even cooking and prevents cracking in your Easter Egg Cheesecake.
Step 5: Bake to Perfection
Bake for 50-55 minutes until the center is almost set but still slightly jiggly. The edges should be lightly golden. Turn off the oven, crack the door open, and let the cheesecake cool in the oven for 1 hour to prevent sudden temperature changes.
Step 6: Create Stunning Easter Decorations
While the cheesecake cools, melt white chocolate with coconut oil in 30-second microwave intervals. Divide into bowls and add different food colorings. Using a spoon, drizzle colorful chocolate over the cooled cheesecake in Easter egg patterns. Arrange chocolate Easter eggs around the border for a festive finish.
Nutritional Information
Each slice of this Easter Egg Cheesecake (based on 12 servings) contains approximately:
- Calories: 385
- Protein: 8g
- Carbohydrates: 35g
- Fat: 24g
- Fiber: 1g
- Sugar: 28g
The cream cheese provides beneficial probiotics that support digestive health, while eggs contribute high-quality protein and essential amino acids. The calcium content supports bone health, making this indulgent dessert offer some nutritional benefits alongside its delicious taste.
Healthier Alternatives for the Recipe
Transform your Easter Egg Cheesecake into a healthier option with these smart substitutions:
For Lower Calories:
- Replace cream cheese with a 50/50 mix of Greek yogurt and Neufchâtel cheese
- Use sugar substitute like erythritol (reduce quantity by 25%)
- Substitute egg whites for whole eggs
For Gluten-Free Version:
- Use almond flour instead of all-purpose flour
- Replace graham crackers with gluten-free alternatives or crushed almonds
For Dairy-Free Option:
- Use cashew cream cheese and coconut cream
- Replace butter with coconut oil
- Choose dairy-free chocolate decorations
For Lower Sugar:
- Use fresh berry compote instead of chocolate decorations
- Incorporate stevia or monk fruit sweetener
- Add lemon zest for natural flavor enhancement
Serving Suggestions
Elevate your Easter Egg Cheesecake presentation with these complementary additions:
Beverage Pairings:
- Freshly brewed coffee or espresso cuts through the richness
- Champagne or prosecco for special celebrations
- Herbal teas like chamomile or lavender complement the creamy texture
Garnish Ideas:
- Fresh spring berries (strawberries, raspberries, blueberries)
- Edible flowers like pansies or violets for Easter elegance
- Whipped cream rosettes with mint leaves
- Toasted coconut flakes for added texture
Plating Suggestions:
- Serve on pastel-colored plates to enhance the Easter theme
- Add a small dollop of berry coulis alongside each slice
- Dust plates lightly with powdered sugar for restaurant-style presentation
Common Mistakes to Avoid
Prevent these frequent issues when making your Easter Egg Cheesecake:
Temperature Troubles: Using cold ingredients leads to lumpy filling. Always bring cream cheese and eggs to room temperature 2-3 hours before baking.
Overmixing Errors: Excessive beating incorporates too much air, causing cracks. Mix ingredients just until combined for smooth results.
Water Bath Failures: Skipping the water bath or using insufficient water creates uneven cooking. Ensure water reaches halfway up the pan sides.
Cooling Catastrophes: Rapid temperature changes cause cracking. Always cool gradually in the oven with the door ajar before refrigerating.
Decoration Disasters: Adding decorations to warm cheesecake causes melting. Wait until completely cool before applying chocolate or toppings.
Storing Tips
Maximize your Easter Egg Cheesecake's freshness and flavor with proper storage techniques:
Refrigeration:
Store covered in the refrigerator for up to 5 days. Use plastic wrap directly on the surface to prevent a skin from forming, then cover the entire pan with foil.
Freezing:
Wrap individual slices in plastic wrap, then aluminum foil for up to 3 months. Freeze the whole cheesecake (without decorations) for up to 2 months. Thaw overnight in the refrigerator before serving.
Reheating Guidelines:
Cheesecake tastes best served chilled and doesn't require reheating. If frozen, allow 4-6 hours for complete thawing. Remove from refrigerator 15 minutes before serving for optimal texture.
Decoration Preservation:
Store decorated cheesecake in a container tall enough to prevent topping damage. If decorations become soft, chill for 30 minutes to firm up before serving.
Conclusion
This Easter Egg Cheesecake recipe proves that impressive holiday desserts don't require professional pastry skills or endless hours in the kitchen. By following these detailed instructions and avoiding common pitfalls, you'll create a stunning centerpiece that captures the joy and celebration of Easter while delivering the rich, creamy satisfaction that makes cheesecake a perennial favorite. The combination of classic flavors with festive decorations ensures this dessert will become a treasured family tradition.
Ready to create your own Easter masterpiece? Gather your ingredients, follow these steps, and prepare to wow your guests with this show-stopping Easter Egg Cheesecake. Don't forget to share photos of your beautiful creation and let us know how your family reacted to this delightful spring dessert!
FAQs
Can I make Easter Egg Cheesecake ahead of time?
Absolutely! This cheesecake actually improves in flavor when made 1-2 days ahead. Prepare the cheesecake completely, cover tightly, and refrigerate. Add decorations on the day of serving for best appearance.
Why did my cheesecake crack, and how can I fix it?
Cracks typically result from overmixing, rapid temperature changes, or overbaking. Prevention includes using room temperature ingredients, gradual cooling, and proper water bath technique. Minor cracks can be hidden with toppings or whipped cream.
Can I use a different pan size for this recipe?
Yes, but adjust baking time accordingly. A larger pan requires less time (40-45 minutes), while smaller pans need longer (60-65 minutes). The center should still jiggle slightly when done.
How do I know when my Easter Egg Cheesecake is properly set?
The cheesecake is ready when the edges are set and lightly golden, but the center still has a slight jiggle when gently shaken. It will continue firming during the cooling process.

