Follow Me On Social Media!
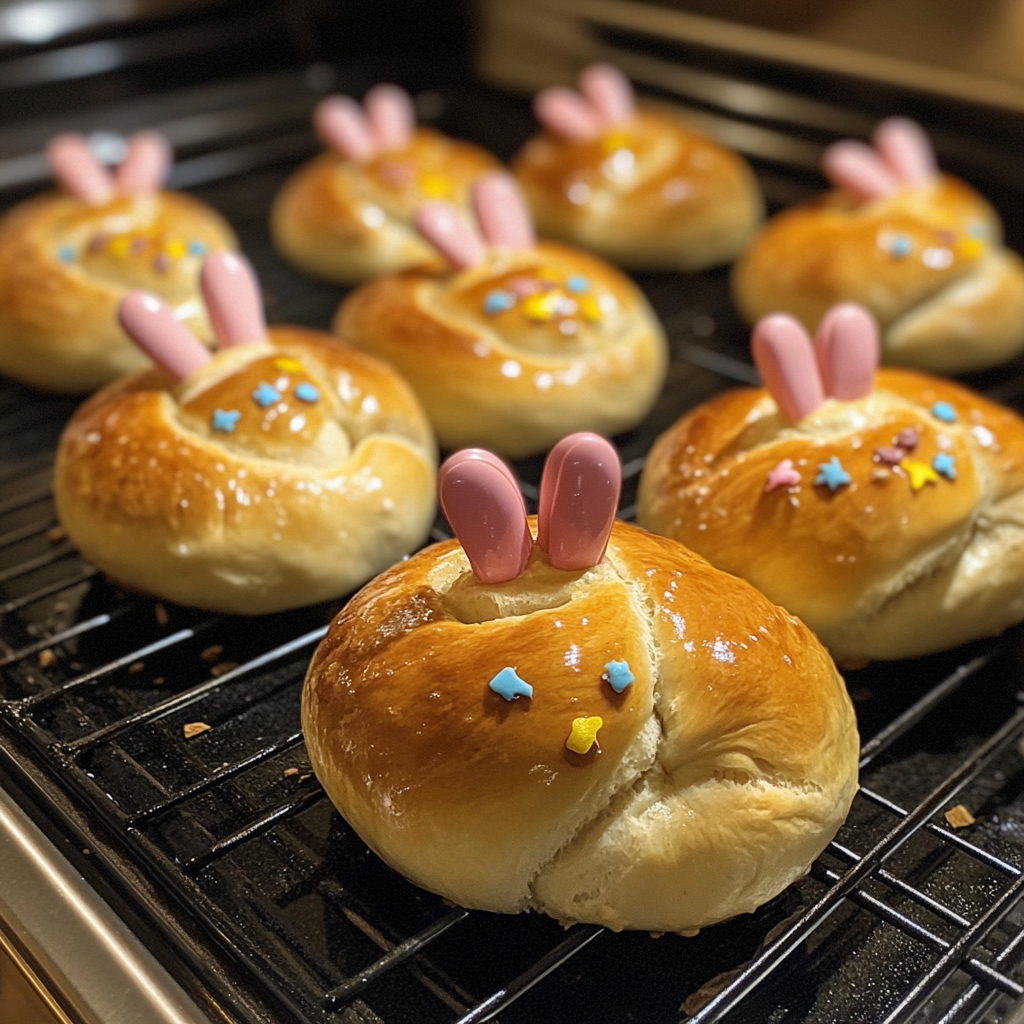
Easter Bunny Buns
Introduction
Did you know that 87% of families who bake together during Easter create traditions that last for generations? This surprising statistic from the American Baking Association reveals just how powerful homemade Easter treats can be in bringing families closer. If you're looking to start your own delicious tradition this spring, Easter Bunny Buns are the perfect recipe to capture hearts and create lasting memories around your kitchen table.
These adorable, fluffy bunny-shaped bread rolls combine the joy of baking with the whimsical spirit of Easter. Unlike store-bought alternatives that often contain preservatives and artificial flavors, homemade Easter Bunny Buns allow you to control every ingredient while creating an interactive baking experience that kids and adults alike will treasure. The soft, pillowy texture and subtle sweetness make these buns irresistible, while their charming bunny shape transforms an ordinary meal into a festive celebration.
Whether you're planning an Easter brunch, looking for a fun weekend baking project, or simply want to add some seasonal magic to your dinner table, these bunny buns deliver both visual appeal and incredible taste that will have everyone asking for the recipe.

Ingredients List
Creating perfect Easter Bunny Buns requires simple, pantry-friendly ingredients that work together to create tender, flavorful bread. Here's everything you'll need for approximately 12 bunny-shaped buns:
For the Dough:
- 3½ cups all-purpose flour (substitute with bread flour for chewier texture)
- 1 packet (2¼ teaspoons) active dry yeast
- ¼ cup granulated sugar (honey or maple syrup work as natural alternatives)
- 1 teaspoon salt
- ¾ cup warm milk (dairy-free milk like oat or almond milk for vegan version)
- 3 tablespoons melted butter (coconut oil for dairy-free option)
- 1 large egg (flax egg for vegan alternative)
- 1 teaspoon vanilla extract
For Assembly and Finishing:
- 24 raisins or mini chocolate chips for eyes
- 12 small pieces of dried cranberry or pink candy for noses
- 1 egg beaten with 1 tablespoon milk for egg wash (plant milk for vegan)
- Sesame seeds or poppy seeds for texture (optional)
The beauty of this recipe lies in its flexibility – you can easily accommodate dietary restrictions while maintaining the delightful bunny shape and soft texture that makes these buns so special.
Timing
Understanding the time commitment helps you plan the perfect baking day for your Easter Bunny Buns:
- Preparation Time: 20 minutes
- First Rise: 1 hour
- Shaping and Assembly: 15 minutes
- Second Rise: 30 minutes
- Baking Time: 15-18 minutes
- Total Time: 2 hours 30 minutes
Compared to average yeast bread recipes that often require 3-4 hours, these bunny buns are relatively quick while still developing excellent flavor and texture. The active hands-on time is only about 35 minutes, making this an achievable weekend project even for busy families.
Step-by-Step Instructions
Step 1: Activate the Yeast
Combine warm milk (around 110°F), sugar, and yeast in a large mixing bowl. The milk should feel comfortably warm, not hot, as excessive heat kills yeast. Stir gently and let sit for 5-10 minutes until the mixture becomes foamy and fragrant. This bubbling action confirms your yeast is alive and ready to create fluffy Easter Bunny Buns.
Step 2: Create the Dough Base
Add melted butter, egg, vanilla extract, and salt to the activated yeast mixture. Whisk until well combined. Gradually incorporate flour, one cup at a time, mixing with a wooden spoon until a soft dough forms. The dough should be slightly sticky but manageable – resist adding too much flour at this stage.
Step 3: Knead to Perfection
Turn the dough onto a lightly floured surface and knead for 8-10 minutes until smooth and elastic. Proper kneading develops gluten structure, ensuring your bunny buns have the perfect tender yet structured texture. The dough is ready when it springs back lightly when poked.
Step 4: First Rise
Place the kneaded dough in a greased bowl, turning once to coat all surfaces. Cover with a damp kitchen towel and let rise in a warm, draft-free location for about 1 hour, or until doubled in size. This rise develops flavor and creates the airy texture that makes these Easter treats so delightful.
Step 5: Shape Your Easter Bunny Buns
Punch down the risen dough and divide into 12 equal portions. For each bunny, take one portion and divide it further: use about ¾ for the body and ¼ for the head and ears. Shape the larger piece into an oval for the body, and divide the smaller piece into three parts – one for the head and two for ears. Arrange on parchment-lined baking sheets, leaving space between each bunny.
Step 6: Add Facial Features
Gently press raisins or chocolate chips into each bunny head for eyes, and add a small piece of dried cranberry for the nose. These details transform simple bread into charming Easter Bunny Buns that children will absolutely adore.
Step 7: Second Rise and Bake
Cover shaped buns with a light kitchen towel and let rise for 30 minutes. Preheat your oven to 375°F during the last 10 minutes of rising. Brush each bunny with egg wash for a beautiful golden finish, then bake for 15-18 minutes until golden brown and hollow-sounding when tapped.
Nutritional Information
Each Easter Bunny Bun provides approximately:
- Calories: 185
- Protein: 5.5g
- Carbohydrates: 32g
- Fat: 4g
- Fiber: 1.5g
- Sugar: 6g
These homemade bunny buns offer significantly better nutritional value than commercial alternatives, providing complex carbohydrates for sustained energy and protein for muscle maintenance. The moderate sugar content comes primarily from natural milk sugars and a small amount of added sugar, making these treats a reasonable indulgence for Easter celebrations.
Healthier Alternatives for the Recipe
Transform your Easter Bunny Buns to accommodate various dietary needs without sacrificing taste or charm:
Whole Grain Version: Substitute half the all-purpose flour with whole wheat pastry flour for added fiber and nutrients. This creates heartier bunny buns with a slightly nuttier flavor.
Reduced Sugar: Cut the sugar in half and add an extra teaspoon of vanilla extract to maintain sweetness perception while reducing overall sugar content.
Gluten-Free Option: Use a 1:1 gluten-free flour blend designed for yeast breads. Add 1 teaspoon xanthan gum if not included in your flour blend.
Vegan Easter Bunny Buns: Replace dairy milk with oat milk, use coconut oil instead of butter, and substitute the egg with a flax egg (1 tablespoon ground flaxseed mixed with 3 tablespoons water).
Serving Suggestions
These versatile Easter Bunny Buns complement numerous breakfast and brunch options:
Serve warm with honey butter, strawberry jam, or cream cheese for a delightful Easter morning treat. They pair beautifully with fresh fruit salads featuring spring berries and citrus segments. For a complete Easter brunch, arrange your bunny buns alongside scrambled eggs, crispy bacon, and fresh orange juice.
Consider creating a "build-your-own" bunny sandwich station with sliced ham, turkey, cheese, and fresh vegetables – kids love customizing their bunny buns into mini sandwiches. For beverage pairings, try freshly brewed coffee for adults and chocolate milk or fruit smoothies for children.
Common Mistakes to Avoid
Prevent disappointing results by avoiding these frequent Easter Bunny Bun pitfalls:
Overheating Liquid: Water or milk that's too hot kills yeast, preventing proper rising. Always test temperature with your wrist – it should feel comfortably warm, not hot.
Insufficient Rising Time: Rushing the rise produces dense, heavy buns. Always allow full rising time, even if it takes longer than expected in cooler kitchens.
Over-flouring: Adding too much flour during kneading creates tough, dry bunny buns. The dough should remain slightly tacky for optimal texture.
Overbaking: Watch carefully during the final minutes of baking. Overbaked buns become dry and lose their tender appeal.
Storing Tips
Maximize the enjoyment of your Easter Bunny Buns with proper storage techniques:
Short-term Storage: Keep buns fresh for 2-3 days at room temperature in an airtight container or plastic bag. Place a slice of bread in the container to maintain moisture.
Freezing: Wrap cooled buns individually in plastic wrap, then place in freezer bags. They'll maintain quality for up to 3 months. Thaw at room temperature for 2-3 hours before serving.
Reheating: Warm day-old buns in a 300°F oven for 5-7 minutes, or wrap in damp paper towels and microwave for 15-20 seconds to restore softness.
Conclusion
Easter Bunny Buns represent more than just another bread recipe – they're an opportunity to create magical memories while filling your home with the irresistible aroma of fresh-baked bread. The combination of simple ingredients, achievable techniques, and adorable results makes this recipe perfect for bakers of all skill levels.
These charming bunny-shaped treats bring families together in the kitchen, encourage creativity in young bakers, and provide a delicious centerpiece for Easter celebrations. The soft, slightly sweet flavor appeals to all ages, while the customizable nature allows you to adapt the recipe for various dietary preferences.
Ready to start your own Easter baking tradition? Gather your ingredients, invite the family to help, and create these delightful Easter Bunny Buns that will become a treasured part of your holiday celebrations. Don't forget to share photos of your adorable bunny creations – we'd love to see how your Easter Bunny Buns turn out!
FAQs
Can I make Easter Bunny Buns ahead of time?
Absolutely! You can prepare the dough through the first rise, then refrigerate overnight. Allow the dough to come to room temperature before shaping. Alternatively, shape the buns and freeze them before the second rise – just thaw and rise when ready to bake.
What if my bunny ears keep falling off during baking?
Ensure you're pressing the ear pieces firmly into the head portion when shaping. If they continue separating, try slightly dampening the connection points with water before pressing together, which helps create a stronger bond.
Can I use instant yeast instead of active dry yeast?
Yes, you can substitute instant yeast using the same amount. Mix it directly with the dry ingredients rather than activating it in warm liquid first. The rising times may be slightly shorter with instant yeast.
How do I know when my Easter Bunny Buns are fully baked?
Properly baked buns will be golden brown on top and sound hollow when gently tapped on the bottom. An instant-read thermometer should register 190°F when inserted into the center of a bun.


