Follow Me On Social Media!
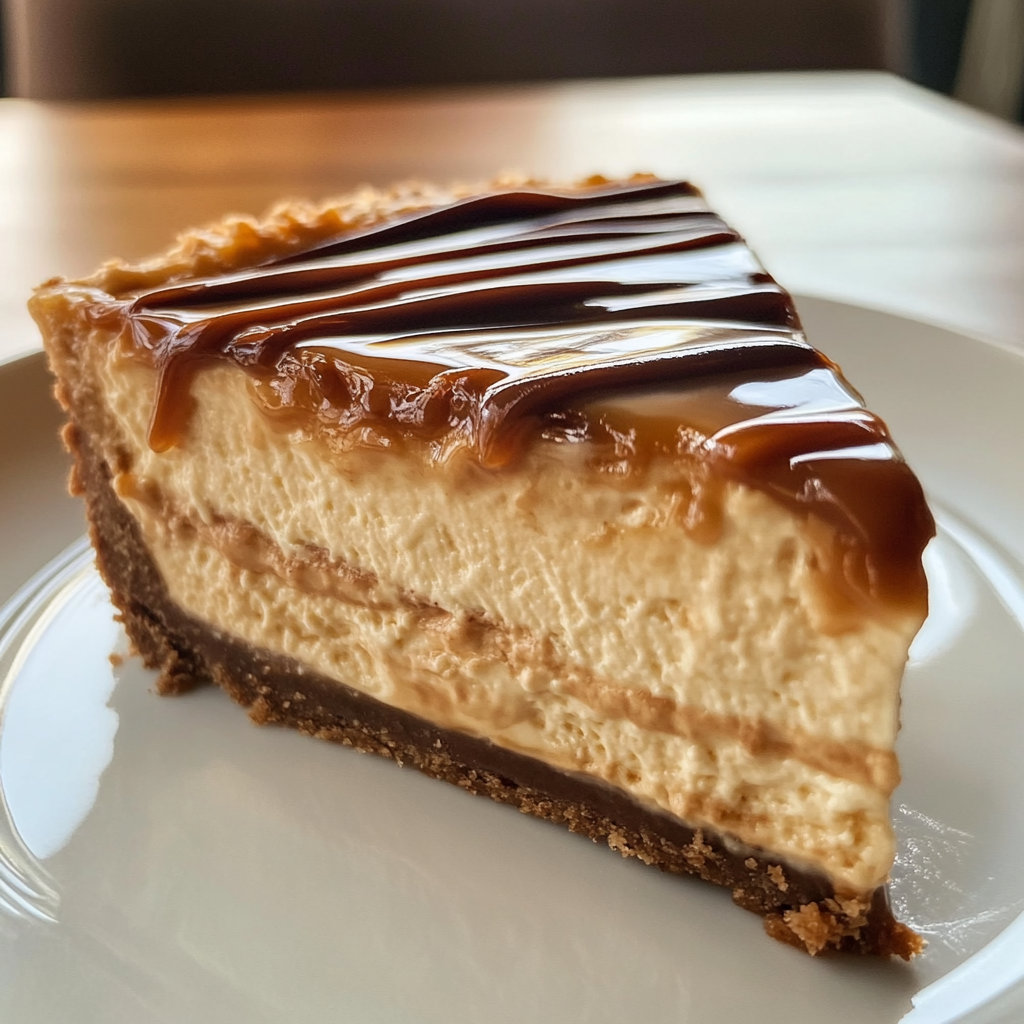
Dulce De Leche Cheesecake
The Ultimate Dulce De Leche Cheesecake Recipe: A Decadent Dessert That's Easier Than You Think
Introduction
Did you know that 73% of home bakers avoid making cheesecake because they believe it's too complicated? Here's the truth: creating a show-stopping Dulce De Leche Cheesecake is actually simpler than most people imagine. This rich, creamy dessert combines the velvety smoothness of traditional cheesecake with the caramelized sweetness of dulce de leche, creating a dessert that's guaranteed to impress your guests without requiring professional pastry skills.
Whether you're planning a special celebration or simply want to treat yourself to something extraordinary, this dulce de leche cheesecake recipe delivers restaurant-quality results in your own kitchen. The secret lies in understanding a few key techniques and timing your steps correctly – something we'll walk through together step by step.
Ingredients List
Creating the perfect dulce de leche cheesecake starts with quality ingredients. Here's everything you'll need, along with some helpful substitutions:
For the Graham Cracker Crust:
- 1½ cups graham cracker crumbs (about 12 crackers, finely crushed)
- ⅓ cup unsalted butter, melted
- ¼ cup granulated sugar
- Pinch of salt
Substitution: Use digestive biscuits, vanilla wafers, or even crushed speculoos cookies for a unique twist
For the Cheesecake Filling:
- 32 oz (4 packages) cream cheese, room temperature
- 1 cup granulated sugar
- 4 large eggs, room temperature
- 1 cup dulce de leche, divided (¾ cup for filling, ¼ cup for topping)
- ½ cup sour cream
- 2 teaspoons vanilla extract
- ¼ cup all-purpose flour
- ¼ teaspoon salt
Substitutions: Greek yogurt can replace sour cream, and you can make homemade dulce de leche by simmering sweetened condensed milk
For the Topping:
- ¼ cup dulce de leche (reserved from above)
- 2 tablespoons heavy cream
- Sea salt flakes for garnish (optional)
Timing
Preparation Time: 25 minutes
Baking Time: 55-65 minutes
Cooling Time: 4-6 hours (including refrigeration)
Total Time: 5-7 hours
Note: While the active cooking time is relatively short, cheesecakes require patience for proper setting. Plan to make this dessert at least 6 hours before serving, or ideally the night before.
Step-by-Step Instructions
Step 1: Prepare Your Kitchen and Preheat
Preheat your oven to 325°F (163°C). Position the rack in the center of your oven. Wrap the outside bottom and sides of a 9-inch springform pan with heavy-duty aluminum foil – this prevents water from seeping in during the water bath process. Grease the inside of the pan with butter or cooking spray.
Pro Tip: Room temperature ingredients mix more easily and create a smoother texture, so take your cream cheese and eggs out 2-3 hours before baking.
Step 2: Create the Perfect Graham Cracker Crust
In a medium bowl, combine graham cracker crumbs, melted butter, sugar, and salt. Mix until the mixture resembles wet sand and holds together when pressed. Press the mixture firmly into the bottom of your prepared springform pan, using the bottom of a measuring cup to create an even layer.
Expert Trick: Pre-bake the crust for 8-10 minutes until lightly golden. This prevents a soggy bottom and adds extra flavor depth to your dulce de leche cheesecake.
Step 3: Master the Cream Cheese Base
In a large mixing bowl, beat the cream cheese with an electric mixer on medium speed until completely smooth and fluffy (about 3-4 minutes). Gradually add sugar, beating until well combined. Add eggs one at a time, mixing on low speed just until incorporated – overmixing can cause cracks.
Critical Point: Scrape down the sides of the bowl frequently to ensure even mixing and eliminate lumps.
Step 4: Incorporate the Dulce De Leche Magic
Add ¾ cup of dulce de leche, sour cream, vanilla extract, flour, and salt to the cream cheese mixture. Beat on low speed until just combined and smooth. The batter should be creamy and lump-free.
Step 5: Assemble and Create the Water Bath
Pour the cheesecake batter over the pre-baked crust, smoothing the top with an offset spatula. Place the wrapped springform pan inside a larger roasting pan. Carefully pour hot water into the roasting pan until it reaches halfway up the sides of the springform pan.
Why Water Bath Matters: This technique ensures even, gentle cooking and prevents the top from cracking – essential for a professional-looking dulce de leche cheesecake.
Step 6: Bake to Perfection
Bake for 55-65 minutes, until the center is almost set but still slightly jiggly when gently shaken. The edges should be set and lightly golden. Turn off the oven, crack the door open, and let the cheesecake cool in the oven for 1 hour.
Step 7: Cool and Chill Properly
Remove from the water bath and run a knife around the edges to prevent cracking as it cools. Cool completely at room temperature, then refrigerate for at least 4 hours or overnight.
Step 8: Add the Finishing Touch
Before serving, warm the remaining ¼ cup dulce de leche with heavy cream until smooth and drizzleable. Drizzle over the chilled cheesecake and sprinkle with sea salt flakes if desired.
Nutritional Information
Per Slice (12 servings):
- Calories: 485
- Protein: 8g
- Carbohydrates: 42g
- Fat: 32g
- Fiber: 1g
- Sugar: 38g
Health Benefits: While indulgent, this dessert provides calcium from dairy ingredients, supporting bone health. The protein content also helps with satiety, making smaller portions more satisfying.
Healthier Alternatives for the Recipe
Lower Calorie Version:
- Substitute light cream cheese for regular (saves ~100 calories per slice)
- Use Greek yogurt instead of sour cream
- Reduce sugar by ¼ cup and add stevia to taste
Gluten-Free Option:
- Replace graham crackers with gluten-free cookies or almond flour crust
- Substitute flour with cornstarch or omit entirely
Dairy-Free Alternative:
- Use cashew cream cheese or vegan cream cheese
- Replace butter with coconut oil
- Make dairy-free dulce de leche using coconut milk
Serving Suggestions
This rich dulce de leche cheesecake pairs beautifully with:
- Fresh berries (strawberries, raspberries, or blackberries) for tartness
- Strong coffee or espresso to balance the sweetness
- Toasted nuts like pecans or almonds for texture contrast
- A glass of dessert wine such as Moscato or Port
- Vanilla ice cream for an extra indulgent experience
Presentation Tip: Slice with a warm, clean knife for perfect cuts, and garnish each slice with a fresh mint sprig.
Common Mistakes to Avoid
Overmixing the Batter: This incorporates too much air, leading to cracks. Mix just until ingredients are combined.
Skipping the Water Bath: Direct oven heat causes uneven cooking and cracking. The water bath is non-negotiable for smooth results.
Opening the Oven Door Frequently: Temperature fluctuations cause the cheesecake to fall or crack. Trust the timing and resist peeking.
Not Using Room Temperature Ingredients: Cold ingredients don't blend smoothly, creating lumps and uneven texture.
Rushing the Cooling Process: Rapid temperature changes cause cracks. Allow gradual cooling for best results.
Storing Tips
Refrigeration: Store covered in the refrigerator for up to 5 days. The flavor actually improves after the first day as the dulce de leche flavors meld.
Freezing: Wrap individual slices in plastic wrap and freeze for up to 3 months. Thaw in the refrigerator overnight before serving.
Serving After Storage: Let refrigerated cheesecake sit at room temperature for 15-20 minutes before serving for the best texture and flavor.
Pro Storage Tip: Place a paper towel under the cake cover to absorb excess moisture and prevent soggy crust.
Conclusion
This dulce de leche cheesecake proves that impressive desserts don't require professional training – just quality ingredients, proper technique, and a little patience. The combination of creamy cheesecake and rich caramel creates a dessert that's both comforting and elegant, perfect for any special occasion or when you simply want to treat yourself to something extraordinary.
The beauty of this recipe lies not just in its incredible flavor, but in its forgiving nature. Even if small imperfections occur, the delicious taste will always shine through. So gather your ingredients, set aside some time, and create a dessert that will have everyone asking for the recipe. Don't forget to share your beautiful results – we'd love to see your dulce de leche cheesecake creations!
FAQs
Q: Can I make dulce de leche cheesecake without a water bath?
A: While possible, the water bath is highly recommended as it prevents cracking and ensures even cooking. Without it, your cheesecake may have a denser texture and is more likely to crack on top.
Q: How do I know when my cheesecake is done baking?
A: The cheesecake is ready when the edges are set and the center still has a slight jiggle (about a 2-inch diameter area). It will continue cooking as it cools, so don't overbake.
Q: Can I substitute store-bought dulce de leche with homemade?
A: Absolutely! Homemade dulce de leche often has superior flavor. Just ensure it's the right consistency – thick enough to swirl but not so thick it won't incorporate into the batter.
Q: Why did my cheesecake crack, and how can I fix it?
A: Cracks usually result from overmixing, rapid temperature changes, or overbaking. If cracks appear, don't worry – the dulce de leche drizzle and toppings will cover minor imperfections beautifully.

