Follow Me On Social Media!
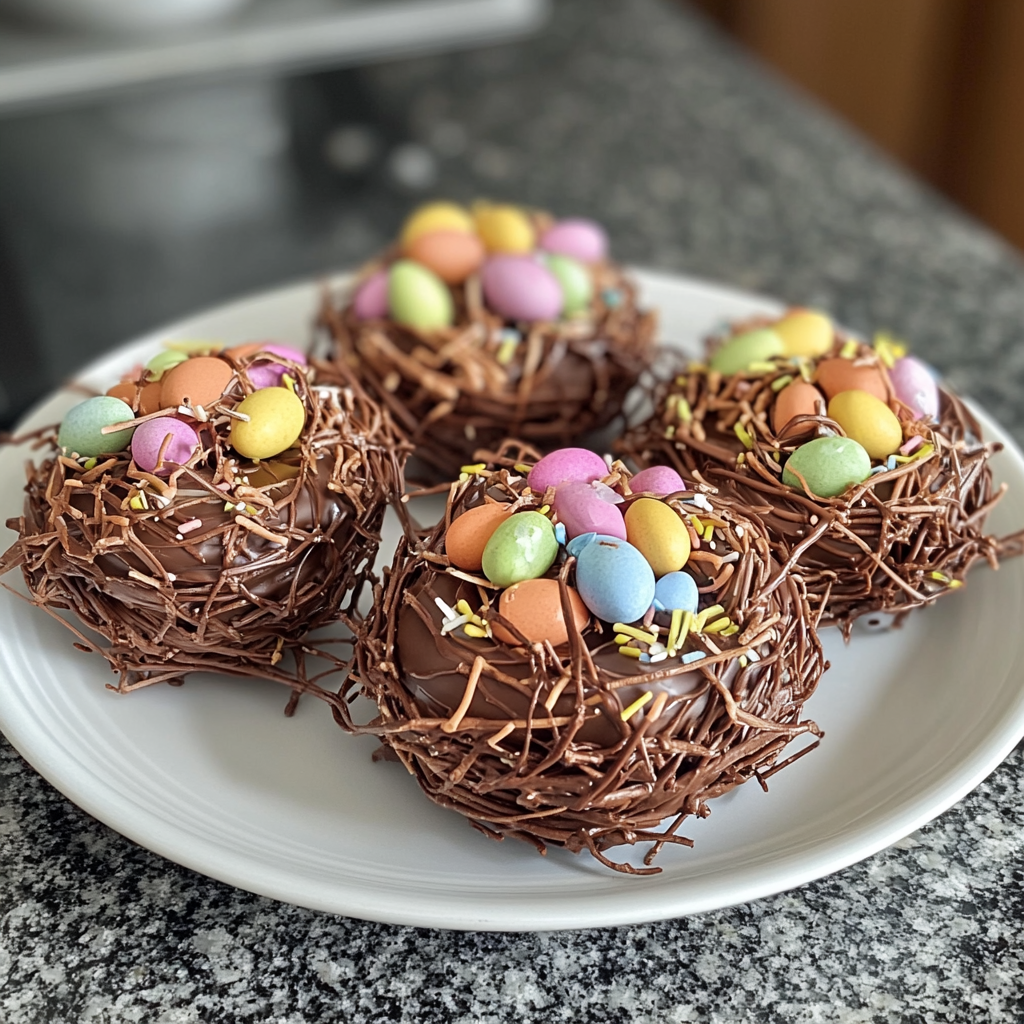
Chocolate Easter Nests
Introduction
Did you know that 91% of households report making homemade Easter treats with their children, yet many struggle to find recipes that are both simple and impressive? If you're searching for the perfect springtime dessert that combines nostalgic charm with irresistible taste, Chocolate Easter Nests might just be your answer. These delightful treats capture the essence of Easter celebration while requiring minimal ingredients and effort. Whether you're planning an Easter brunch, looking for a fun family baking project, or simply craving something sweet and seasonal, these chocolate Easter nests deliver on all fronts with their perfect balance of crispy texture and rich chocolate flavor.

Ingredients List
Creating perfect chocolate Easter nests requires just a handful of simple ingredients that you likely already have in your pantry. Here's everything you'll need to make approximately 12 delicious nests:
Essential Ingredients:
- 200g milk chocolate chips or chopped chocolate (alternatively, use dark chocolate for a richer flavor)
- 75g cornflakes or crispy rice cereal (Rice Krispies work perfectly)
- 36 mini chocolate eggs (3 per nest)
- 2 tablespoons unsalted butter (adds smoothness and shine)
Optional Enhancements:
- 1 tablespoon golden syrup or honey (for extra binding and sweetness)
- Pinch of sea salt (enhances chocolate flavor)
- Shredded coconut (for texture variation)
Possible Substitutions:
- Chocolate: White chocolate, dark chocolate, or even sugar-free chocolate chips
- Cereal: Crushed digestive biscuits, granola, or even toasted oats
- Eggs: Jelly beans, chocolate buttons, or fresh berries for a healthier twist
- Butter: Coconut oil for a dairy-free version
Timing
Preparation Time: 15 minutes
Setting Time: 30-45 minutes (refrigeration)
Total Time: 1 hour
This recipe is remarkably quick compared to traditional Easter baking projects, which typically require 2-3 hours. The beauty of chocolate Easter nests lies in their simplicity – most of your time is passive waiting while the treats set in the refrigerator.
Step-by-Step Instructions
Step 1: Prepare Your Workspace
Set up your kitchen for success by lining a large baking tray with parchment paper or placing 12 paper cupcake cases on a flat surface. This preparation prevents the chocolate Easter nests from sticking and makes cleanup effortless. Ensure your workspace is cool, as chocolate can become temperamental in warm environments.
Step 2: Melt the Chocolate Mixture
Break your chocolate into small, uniform pieces and place them in a large, heatproof bowl along with the butter. Using the double-boiler method, place the bowl over a saucepan of gently simmering water, ensuring the bowl doesn't touch the water. Stir occasionally until the mixture becomes smooth and glossy. Pro tip: Alternatively, use a microwave in 30-second intervals, stirring between each burst to prevent burning.
Step 3: Incorporate the Cereal
Remove the melted chocolate from heat and immediately add your cornflakes or chosen cereal. Using a large spoon, gently fold the cereal into the chocolate, ensuring every piece is well-coated but maintaining the cereal's crispy texture. The mixture should hold together when pressed but remain light and airy.
Step 4: Shape Your Easter Nests
Working quickly while the chocolate is still workable, spoon generous portions of the mixture into your prepared cases or directly onto parchment paper. Using the back of a teaspoon or your clean fingers, create a small depression in the center of each mound, forming the characteristic nest shape. Don't worry about perfection – rustic nests look more authentic!
Step 5: Add the Finishing Touches
Gently press three mini chocolate eggs into the center of each nest while the chocolate is still slightly warm. This ensures they'll set securely in place. If desired, sprinkle a pinch of shredded coconut around the edges for added texture and visual appeal.
Step 6: Set and Chill
Transfer your completed chocolate Easter nests to the refrigerator for 30-45 minutes, or until completely set. The chocolate should feel firm to the touch and hold its shape when gently lifted.
Nutritional Information
Per Serving (1 nest):
- Calories: 145
- Protein: 2.5g
- Carbohydrates: 20g
- Total Fat: 7g
- Fiber: 1g
- Sugar: 16g
Health Benefits:
These chocolate Easter nests provide a moderate source of iron and magnesium from the chocolate, while the fortified cereal adds essential B vitamins. The portion-controlled nature of individual nests helps with mindful eating during Easter celebrations.
Healthier Alternatives for the Recipe
Transform your chocolate Easter nests into guilt-free treats with these nutritious swaps:
Lower Calorie Version:
- Use sugar-free dark chocolate (reduces calories by 30%)
- Replace half the cereal with puffed rice for lighter texture
Vegan Chocolate Easter Nests:
- Choose dairy-free chocolate chips
- Substitute butter with coconut oil
- Use vegan chocolate eggs or fresh berries
Gluten-Free Option:
- Verify your cereal is certified gluten-free
- Consider using crushed gluten-free cookies instead
Protein-Packed Version:
- Add 2 tablespoons of almond butter to the melted chocolate
- Include chopped nuts in the mixture
Serving Suggestions
Present your chocolate Easter nests as part of a stunning Easter spread:
Beverage Pairings:
- Fresh mint tea complements the chocolate beautifully
- Cold milk for children's parties
- Coffee or espresso for adult gatherings
Complementary Treats:
- Arrange alongside hot cross buns and fresh fruit
- Create an Easter dessert table with carrot cake and lemon tarts
- Serve with vanilla ice cream for an indulgent dessert
Presentation Ideas:
- Display on a tiered cake stand for elegant presentation
- Arrange in a basket lined with Easter grass
- Package individually in clear bags for party favors
Common Mistakes to Avoid
Overheating the Chocolate: Never allow chocolate to exceed 115°F, as it will seize and become unusable. Always use gentle heat and stir frequently.
Adding Wet Cereal: Ensure your cereal is completely dry before mixing, as any moisture will cause the chocolate to clump and lose its smooth texture.
Working Too Slowly: Chocolate begins setting quickly once removed from heat. Have all your materials ready and work efficiently to shape your chocolate Easter nests before the mixture becomes too firm.
Overpacking the Mixture: Gentle folding preserves the cereal's crunch. Aggressive mixing will create dense, less appealing nests.
Storing Tips
Refrigeration: Store completed chocolate Easter nests in an airtight container in the refrigerator for up to one week. Layer between parchment paper to prevent sticking.
Freezing: These treats freeze beautifully for up to three months. Wrap individually in plastic wrap before placing in freezer bags.
Room Temperature Storage: In cool conditions (below 70°F), nests can remain at room temperature for 2-3 days without losing quality.
Texture Preservation: Always store in a dry environment, as humidity can cause the chocolate to develop a white bloom and the cereal to lose its crispness.
Conclusion
Chocolate Easter nests represent the perfect intersection of simplicity, tradition, and irresistible taste. This foolproof recipe delivers professional-looking results that will impress your family and guests while requiring minimal time and ingredients. The combination of rich chocolate, satisfying crunch, and playful presentation makes these treats ideal for Easter celebrations, bake sales, or any spring gathering. Don't wait for Easter to try this delightful recipe – gather your ingredients today and experience the joy of creating these charming edible nests. Share your creations on social media and tag us to show off your beautiful chocolate Easter nests!
FAQs
Q: Can I make chocolate Easter nests ahead of time?
A: Absolutely! These treats actually improve in flavor after 24 hours as the ingredients meld together. Make them up to a week in advance and store in the refrigerator for best results.
Q: Why did my chocolate seize up during melting?
A: Chocolate seizing typically occurs due to water contact or overheating. Ensure all utensils are completely dry and keep temperatures gentle. If your chocolate does seize, try whisking in a tablespoon of warm milk to restore smoothness.
Q: Can I use different types of cereal for variety?
A: Yes! Experiment with various cereals like granola clusters, crushed graham crackers, or even toasted coconut flakes. Each variation creates a unique texture and flavor profile for your chocolate Easter nests.
Q: How do I prevent the chocolate eggs from sinking into the nests?
A: Allow the chocolate mixture to cool slightly before adding the eggs, but not so much that it becomes too firm to create impressions. The eggs should rest gently in the depression rather than sink completely through.


