Follow Me On Social Media!
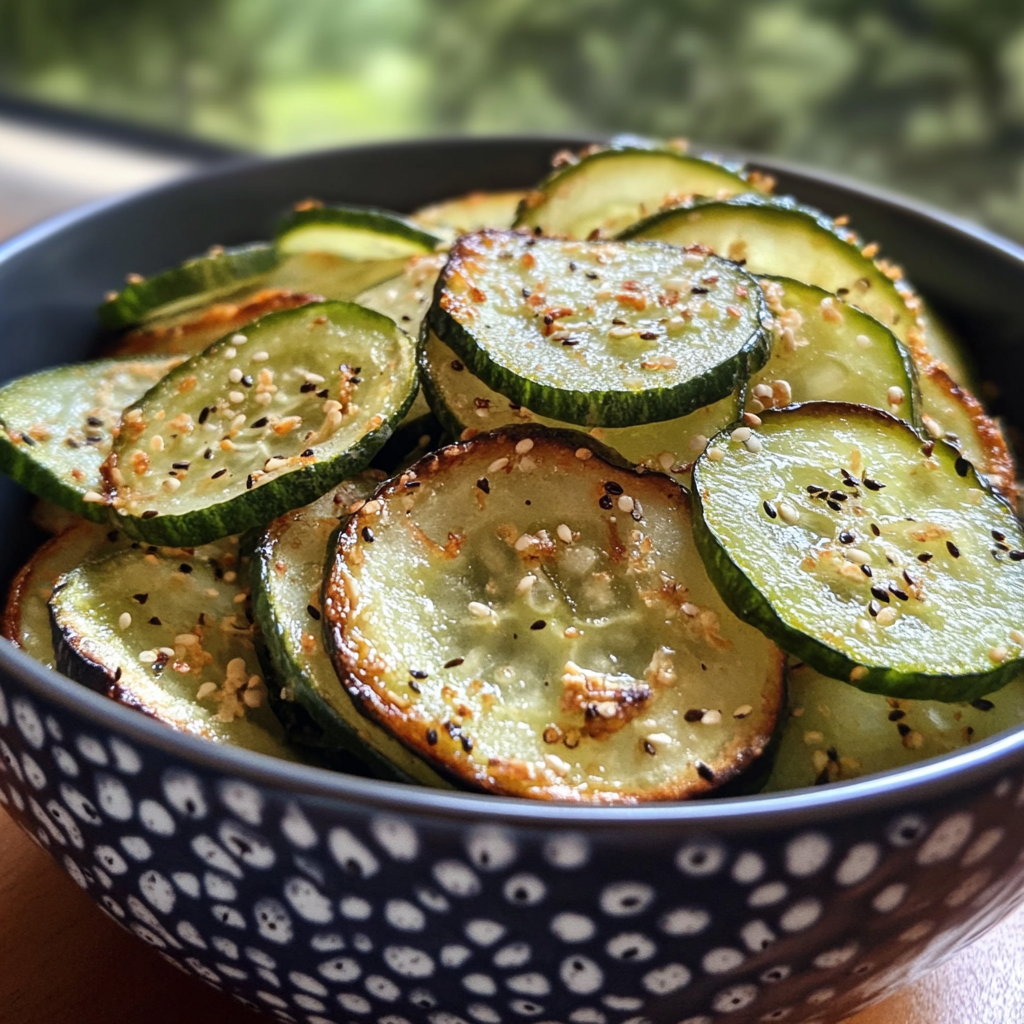
Baked Cucumber Chips
Introduction
Did you know that cucumbers are actually 95% water, making them one of the most hydrating vegetables on the planet? Yet most people only think of them in salads or as spa eye masks! What if I told you that these humble green vegetables could be transformed into crispy, satisfying baked cucumber chips that rival any store-bought snack? While it might sound unconventional, baked cucumber chips are taking the healthy snacking world by storm, offering a guilt-free alternative to traditional potato chips with just a fraction of the calories.
These innovative chips prove that healthy eating doesn't have to be boring or tasteless. With their light, crispy texture and endless seasoning possibilities, baked cucumber chips are perfect for anyone looking to satisfy their crunch cravings without derailing their wellness goals. Whether you're following a low-carb diet, trying to increase your vegetable intake, or simply looking for a fun kitchen experiment, this recipe will revolutionize how you think about cucumbers forever.

Ingredients List
Creating the perfect batch of cucumber chips requires just a handful of simple ingredients that you likely already have in your kitchen:
Essential Ingredients:
- 2 large English cucumbers (about 1.5 pounds) – these work best due to fewer seeds and thinner skin
- 2 tablespoons sea salt or kosher salt (for drawing out moisture)
- 1 tablespoon olive oil or avocado oil spray
- 1 teaspoon garlic powder
- ½ teaspoon onion powder
- ½ teaspoon smoked paprika
- ¼ teaspoon black pepper
- Optional: ¼ teaspoon cayenne pepper for heat
Possible Substitutions:
- Cucumber varieties: Regular cucumbers work too, but you'll need to remove more seeds
- Oil alternatives: Coconut oil spray or even a light brush of melted butter
- Seasoning swaps: Try ranch powder, nutritional yeast for a cheesy flavor, or everything bagel seasoning
- Salt options: Himalayan pink salt or herb-infused salts for gourmet variations
The beauty of this recipe lies in its simplicity – each ingredient serves a specific purpose in creating that perfect crispy texture we're after.
Timing
Preparation Time: 20 minutes (including salting time)
Cooking Time: 2-3 hours
Total Time: 2 hours 20 minutes – 3 hours 20 minutes
While this might seem longer than your average snack preparation, most of this time is hands-off baking time. The extended cooking period is essential for achieving that perfect crispy texture that makes these baked cucumber chips so addictive. Compared to dehydrating vegetables, which can take 6-12 hours, this oven method is relatively quick and doesn't require special equipment.
Step-by-Step Instructions
Step 1: Prepare Your Cucumbers
Start by washing your cucumbers thoroughly and patting them completely dry. Using a mandoline slicer or sharp knife, slice the cucumbers into uniform rounds approximately 1/8 inch thick. Consistency is key here – uneven slices will result in some chips burning while others remain chewy. If using regular cucumbers, gently scrape out the seeds with a small spoon to prevent excess moisture.
Pro tip: A mandoline slicer ensures perfectly even slices, but if using a knife, take your time and focus on maintaining consistent thickness.
Step 2: Salt and Drain
Arrange the cucumber slices in a single layer on clean kitchen towels or paper towels. Sprinkle both sides generously with salt and let them sit for 15 minutes. This crucial step draws out excess moisture, which is the secret to achieving crispy cucumber chips rather than soggy ones. You'll notice water droplets forming on the surface – this is exactly what we want!
Step 3: Remove Excess Moisture
After 15 minutes, pat the cucumber slices completely dry with fresh paper towels. Press gently but firmly to remove as much moisture as possible. Some people even place the salted slices between towels and press with a rolling pin for extra moisture removal.
Step 4: Season Your Chips
Preheat your oven to its lowest setting, typically 170-200°F (77-93°C). Lightly brush or spray the cucumber slices with oil, then sprinkle with your chosen seasonings. Mix the garlic powder, onion powder, paprika, and pepper in a small bowl first for even distribution.
Step 5: Arrange for Baking
Line two large baking sheets with parchment paper or silicone mats. Arrange the seasoned cucumber slices in a single layer, ensuring they don't overlap. Overcrowding will result in steaming rather than crisping.
Step 6: The Long Bake
Place the baking sheets in the oven and bake for 2-3 hours, flipping the chips every 45 minutes to ensure even cooking. The exact time depends on your oven and the thickness of your slices. The baked cucumber chips are ready when they're golden brown and crispy to the touch.
Step 7: Cool and Crisp
Remove from the oven and let the chips cool completely on the baking sheets. They'll continue to crisp up as they cool. If any chips still feel soft, return them to the oven for additional 15-minute intervals.
Nutritional Information
These baked cucumber chips are a nutritional powerhouse that puts regular potato chips to shame:
Per 1-cup serving (approximately 15-20 chips):
- Calories: 25-30
- Protein: 1.5g
- Carbohydrates: 4g
- Fat: 1g
- Fiber: 1.5g
- Sugar: 2g (naturally occurring)
- Sodium: 200mg (varies with salt used)
Health Benefits: Cucumbers are rich in antioxidants, particularly beta-carotene and vitamin C, which support immune function and skin health. The high water content (even after dehydration) helps with hydration, while the fiber supports digestive health. Unlike traditional chips, these contain no trans fats or artificial preservatives.
Healthier Alternatives for the Recipe
Make your cucumber chips even healthier with these simple swaps:
For Lower Sodium: Reduce salt to 1 tablespoon and experiment with herbs like dried dill, thyme, or rosemary for flavor without the sodium spike.
Oil-Free Version: Skip the oil entirely and use cooking spray made from water and lecithin, or try baking them completely dry for an ultra-low-calorie option.
Vegan Confirmation: This recipe is naturally vegan, but ensure any seasoning blends you use don't contain dairy derivatives.
Keto-Friendly: These chips are already very low-carb, but you can add grated parmesan cheese in the last 30 minutes of baking for extra fat and flavor.
Spice Variations: Try curry powder for an Indian twist, nutritional yeast for a cheesy flavor without dairy, or za'atar for a Middle Eastern flair.
Serving Suggestions
These versatile baked cucumber chips pair beautifully with:
Dips and Spreads:
- Homemade hummus or tzatziki
- Guacamole or avocado-based dips
- Greek yogurt mixed with herbs
- Cashew-based cream cheese
Meal Accompaniments:
- Serve alongside grilled chicken or fish
- Use as a crunchy salad topper
- Pack in lunchboxes as a healthy side
- Enjoy with soup instead of crackers
Beverage Pairings:
- Sparkling water with lemon
- Iced herbal teas
- Fresh vegetable juices
- Light white wines for adult gatherings
Common Mistakes to Avoid
Avoid these pitfalls to ensure perfect cucumber chips every time:
Insufficient Moisture Removal: Skipping or rushing the salting step results in chewy rather than crispy chips. Always allow the full 15 minutes for moisture extraction.
Oven Temperature Too High: High heat will burn the edges before the centers crisp up. Low and slow is the key to even cooking.
Overcrowding Pans: Overlapping slices steam each other, preventing proper dehydration. Use multiple baking sheets if necessary.
Inconsistent Slicing: Uneven thickness leads to uneven cooking. Invest time in uniform slicing for professional results.
Not Flipping Regularly: Chips can stick and burn on one side without regular turning. Set a timer to remind yourself every 45 minutes.
Storing Tips
Proper storage keeps your baked cucumber chips crispy and delicious:
Short-term Storage (1-3 days): Store completely cooled chips in an airtight container at room temperature. Add a small packet of food-safe silica gel or a piece of bread to absorb any residual moisture.
Longer Storage: While best eaten fresh, these chips can last up to a week in airtight containers. If they lose crispness, re-crisp them in a 200°F oven for 10-15 minutes.
Freezing: Not recommended, as freezing destroys the crispy texture that makes these chips special.
Reviving Soft Chips: If your chips lose their crunch, spread them on a baking sheet and re-bake at 200°F for 10-15 minutes to restore crispiness.
Conclusion
These baked cucumber chips prove that healthy snacking doesn't require sacrificing flavor or satisfaction. With their incredible crunch, endless seasoning possibilities, and impressive nutritional profile, they're destined to become your new favorite guilt-free indulgence. The simple process transforms an ordinary vegetable into an extraordinary snack that rivals any store-bought alternative.
Ready to revolutionize your snack game? Head to your kitchen and give these amazing cucumber chips a try! Don't forget to experiment with different seasonings and share your creative variations in the comments below. Your taste buds (and your waistline) will thank you for discovering this healthy, delicious alternative to traditional chips.
FAQs
Q: Can I make baked cucumber chips without a mandoline slicer?
A: Absolutely! While a mandoline ensures uniform thickness, a sharp knife works perfectly fine. Just take your time to slice as evenly as possible, aiming for 1/8 inch thickness. Consistent sizing is more important than having special equipment.
Q: Why do my cucumber chips turn out chewy instead of crispy?
A: Chewy chips usually result from insufficient moisture removal or oven temperature that's too high. Make sure to salt the slices for the full 15 minutes and pat them completely dry. Bake at low temperature (170-200°F) for the full time, even if it seems long.
Q: How do I know when my baked cucumber chips are completely done?
A: Properly baked cucumber chips should be golden brown, feel dry to the touch, and make a slight crackling sound when handled. They'll continue to crisp up as they cool, so don't worry if they seem slightly soft when hot.
Q: Can I use different types of cucumbers for this recipe?
A: Yes, but English cucumbers work best due to their thinner skin and fewer seeds. Regular cucumbers work too, but you'll need to remove the seeds and may need slightly longer baking time. Avoid very watery varieties like lemon cucumbers, as they're harder to crisp up.


